™ Netopia 4522 T1 Router Getting Started Guide MAKING BROADBAND WORK™
Copyright ©2002 Netopia, Inc., v.082702 All rights reserved. Printed in the U.S.A. This manual and any associated artwork, software, and product designs are copyrighted with all rights reserved. Under the copyright laws such materials may not be copied, in whole or part, without the prior written consent of Netopia, Inc. Under the law, copying includes translation to another language or format. Netopia is a registered trademark, and “Making Broadband Work” is a trademark of Netopia, Inc.
Contents Contents 3 Chapter 1 — Introduction..........................................................1-1 Overview ....................................................................... 1-1 Features and Capabilities ............................................... 1-1 How to Use this Guide.................................................... 1-2 Chapter 2 — Making the Physical Connections..........................2-1 Find a Location ..............................................................
Getting Started Guide Easy Setup Profile ................................................ 6-8 IP Easy Setup ...................................................... 6-9 Easy Setup Security Configuration ....................... 6-11 Appendix A — Technical Specifications and Safety Information ..A-1 Description.................................................................... A-1 Power requirements ............................................. A-1 Environment ..............................................
Introduction 1-1 Chapter 1 Introduction Overview The Netopia 4522 T1 Router is a full-featured, stand-alone T1 router for connecting diverse local area networks (LANs) to the Internet and other remote networks. The Netopia 4522 T1 Router uses a high performance T1 line to provide your whole network with a high-speed connection to the outside world.
1-2 Getting Started Guide ■ Easy Setup with menu-driven interface ■ Console Tiered Access, 2 levels of configuration access ■ Configuration Management, up to 3 backup configurations ■ System diagnostics and logs ■ SNMP V1 and V2 ■ TFTP or X-Modem download/upload of new firmware and configuration files ■ Utilities: ICMP ping, trace route, Telnet client, and Syslog client ■ LEDs: power, WAN, and Ethernet; link, status, and activity indications for easy monitoring and troubleshooting ■ Wall-mo
Making the Physical Connections 2-1 Chapter 2 Making the Physical Connections This section tells you how to make the physical connections to your Netopia 4522 T1 Router.
2-2 Getting Started Guide You will need: ■ A Windows–based PC or a Macintosh computer with Ethernet connectivity for configuring the Netopia 4522. This may be built-in Ethernet or an add-on card, with TCP/IP installed and configured. See “Sharing the Connection” on page 4-1. ■ A T1 wall outlet wired for a connection to a telephone carrier who supports T1 connections.
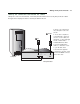
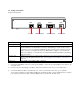
Making the Physical Connections 2-3 Identify the Connectors and Attach the Cables Identify the connectors and switches on the back panel and attach the necessary Netopia Router cables. The figure below displays the back of the Netopia 4522 T1 Router. 1 Ethernet 3 Power 2 T1 Connect your computer, T1 line, and power source as shown. 1. For a direct computer to router Ethernet connection, use a crossover cable (not included), or connect through a hub or switch with a standard Ethernet cable. 2.
2-4 Getting Started Guide Netopia 4522 back panel WAN T1 port 10/100 Ethernet Console Ethernet port Console port Power Power port . Port T1 WAN port Ethernet port Console port Power port Description An RJ-48 jack labeled WAN for your T1 connection. RJ-45 10/100Base-T Ethernet jack. You will use this to configure the Netopia 4522. For a new installation, use an Ethernet connection. Alternatively, you can use the console connection to run console-based management using a direct serial connection.
Making the Physical Connections 2-5 Netopia 4522 T1 Router Status Lights The figure below represents the Netopia 4522 status light (LED) panel. W A N E th e r n e t A L E R T P O W E R Netopia 4522 LED front panel The following table summarizes the meaning of the various LED states and colors: When this happens...
2-6 Getting Started Guide
Connecting to Your Local Area Network 3-1 Chapter 3 Connecting to Your Local Area Network This chapter describes how to physically connect the Netopia 4522 to your local area network (LAN). Before you proceed, make sure the Netopia 4522 is properly configured. You can customize the router’s configuration for your particular LAN requirements using console-based management (see “Console-Based Management” on page 5-1).
3-2 Getting Started Guide Once the Netopia 4522 is properly configured and connected to your LAN, PC and Macintosh computers that have their required components in place will be able to connect to the Internet or other remote IP networks. Connecting to an Ethernet Network You can connect a standard 10/100Base-T Ethernet network to the Netopia 4522 using its Ethernet port.
Sharing the Connection 4-1 Chapter 4 Sharing the Connection Once you have set up your physical local area network, you will need to configure the TCP/IP stack on each client workstation connected to your Netopia 4522. This chapter describes how to configure TCP/IP for both Windows-based and Macintosh computers.
4-2 Getting Started Guide Dynamic configuration (recommended) To configure your PC for dynamic addressing do the following: 1. Go to the Start Menu/Settings/Control Panels and double click the Network icon. From the Network components list, select the Configuration tab. 2. Select TCP/IP-->Your Network Card. Then select Properties. In the TCP/IP Properties screen, select the IP Address tab. Click “Obtain an IP Address automatically”. 3. Click on the DNS Configuration tab. Click Disable DNS.
Sharing the Connection 4-3 Static configuration (optional) If you are manually configuring for a fixed or static IP address, perform the following: 1. Go to Start Menu/Settings/Control Panels and double click the Network icon. From the Network components list, select the Configuration tab. 2. Select TCP/IP-->Your Network Card. Then select Properties. In the TCP/IP Properties screen, select the IP Address tab. Click “Specify an IP Address.” Enter the following: IP Address: 192.168.1.2 Subnet Mask: 255.
4-4 Getting Started Guide 3. Click on the Gateway tab (shown below). Under “New gateway,” enter 192.168.1.1. Click Add. This is the Netopia 4522’s pre-assigned IP address. Click on the DNS Configuration tab. Click Enable DNS. Enter the following information: Host: Type the name you want to give to this computer. Domain: Type your domain name. If you don't have a domain name, type your ISP's domain name; for example, netopia.com.
Sharing the Connection 4-5 Configuring TCP/IP on Macintosh Computers The following is a quick guide to configuring TCP/IP for MacOS computers. Configuring TCP/IP in a Macintosh computer requires the following: You must have either Open Transport or Classic Networking (MacTCP) installed.
4-6 Getting Started Guide Static configuration (optional) If you are manually configuring for a fixed or static IP address, perform the following: 1. Go to the Apple menu. Select Control Panels and then TCP/IP or MacTCP. 2. With the TCP/IP window open, go to the Edit menu and select User Mode. Choose Advanced and click OK. Or, in the MacTCP window, select Ethernet and click the More button. 3.
Sharing the Connection 4-7 Note: You can use these instructions to configure other computers on your network to accept IP addresses served by the Netopia 4522. You can also use these instructions to configure other computers on your network with manual or static IP addresses. Be sure each computer on your network has its own IP address.
4-8 Getting Started Guide
Console-Based Management 5-1 Chapter 5 Console-Based Management Console-based management is a menu-driven interface for the capabilities built into the Netopia 4522. Console-based management provides access to a wide variety of features that the router supports. You can customize these features for your individual setup. This chapter describes how to access the console-based management screens.
5-2 Getting Started Guide may be using the router to connect to more than one service provider or remote site.
Console-Based Management 5-3 Configuring Telnet software If you are configuring your router using a Telnet session, your computer must be running a Telnet software program. ■ If you connect a PC with Microsoft Windows, you can use a Windows Telnet application or simply run Telnet from the Start menu. ■ If you connect a Macintosh computer, you can use the NCSA Telnet program supplied on the Netopia 4522 CD. You install NCSA Telnet by simply dragging the application from the CD to your hard disk.
5-4 Getting Started Guide Launch your terminal emulation software and configure the communications software for the values shown in the table below. These are the default communication parameters that the Netopia 4522 uses. Parameter Suggested Value Terminal type PC: ANSI-BBS Mac: ANSI, VT-100, or VT-200 Data bits 8 Parity None Stop bits 1 Speed 9600 - 57600 bits per second Flow Control None Note: The router firmware contains an autobaud detection feature.
Easy Setup 6-1 Chapter 6 Easy Setup This chapter describes how to use the Easy Setup console screens on your Netopia 4522. After completing the Easy Setup console screens, your router will be ready to connect to the Internet or another remote site.
6-2 Getting Started Guide Netopia 4522 Easy Setup... WAN Configuration... System Configuration... Utilities & Diagnostics... Statistics & Logs... Quick Menus... Quick View... If you do not see the Main Menu, verify that: ■ If you are using a serial connection, that your serial port speed is the same as the Netopia 4522’s default 9600 baud, for first use.
Easy Setup 6-3 Quick Easy Setup Connection Path This section may be all you need to do to configure your Netopia 4522 T1 Router. Your service provider will supply you with several parameter values.
6-4 Getting Started Guide ❑ RFC1483 RFC1483 Mode: ❑ Bridged 1483 (default) or ❑ Routed 1483 Data Circuit (ATM Operation Mode only VPI (0-255): (default is 0) _______________________ VCI (32-65535): (default is 35) _______________________ (for Bridged 1483 only) PPP over Ethernet (PPPoE) ❑ Off (default) or ❑ On Easy Setup Profile Screen Address Translation Enabled: IP Addressing: (for Frame Relay DLEs only) Frame Relay Management Type: (for PPP DLEs only) PPP Authentication: ❑ Yes (default) or ❑
Easy Setup 6-5 The following steps will get you up and running quickly: 1. Open a Telnet session to 192.168.1.1 to bring up the Main Menu. If you don't know how to do this, see “Connecting through a Telnet Session” on page 5-2. Alternatively, you can connect the console cable and open a direct serial console connection, using a terminal emulator program. See “Connecting a Console Cable to Your Router” on page 5-3. The Main Menu appears. Netopia 4522 Easy Setup... WAN Configuration... System Configuration.
6-6 Getting Started Guide T1 Line Configuration The T1 Line Configuration screen appears. T1 Line Configuration Operation Mode... Line Encoding... Framing Mode... HDLC B8ZS ESF AutoDetect DS0 Channels: Number of DS0 Channels: First DS0 Channel: No 1 1 Channel Data Rate... Nx64k Data Link Encapsulation... PPP over Frame Relay Enabled: Frame Relay Off TO MAIN MENU NEXT SCREEN Return/Enter goes to new screen. Enter Information supplied to you by your telephone company. 1.
Easy Setup 6-7 7. Select Channel Data Rate and highlight the data rate that your service provider has designated your channel to connect at. The channel data rate choices are Nx56k or Nx64k. The default is Nx64k. Press Return. 8. Select Data Link Encapsulation and highlight the method of encapsulation that you want to use from the pop-up menu. The choices offered are PPP, RFC1483, and Frame Relay. The default setting is Frame Relay. The screen will offer different options depending on your selection.
6-8 Getting Started Guide Routed 1483. If you select Bridged 1483, a new option PPP over Ethernet (PPPoE) appears. You can then toggle PPPoE On or Off. Choosing Routed 1483 hides the PPPoE option. ■ 9. If you selected ATM Operation Mode in Step 1, the Data Circuit VPI and VCI fields become visible. These are editable fields. The default values 0 and 35 are typical for ADSL circuits, so you will only need to change them if your service provider explicitly tells you to do so.
Easy Setup 6-9 If you selected Numbered, the following fields appear. ■ Select the editable field labeled Local WAN IP Address. The default address is 0.0.0.0, which allows for dynamic addressing, when your ISP assigns an address each time you connect. However, you can enter another specific address if you want to use static addressing. In that case, enter the local WAN address your ISP gave you. Press Return. ■ Select the editable field labeled Local WAN IP Mask.
6-10 Getting Started Guide IP Easy Setup Ethernet IP Address: Ethernet Subnet Mask: 192.168.1.1 255.255.255.0 Domain Name: Primary Domain Name Server: Secondary Domain Name Server: isp.net 209.3.224.21 209.3.224.20 Default IP Gateway: 127.0.0.2 IP Address Serving: On Number of Client IP Addresses: 1st Client Address: 100 192.168.1.100 PREVIOUS SCREEN NEXT SCREEN Enter an IP address in decimal and dot form (xxx.xxx.xxx.xxx). Set up the basic IP & IPX attributes of your Netopia in this screen.
Easy Setup 6-11 7. Toggle IP Address Serving to On or Off, depending on whether you want the device’s IP address server to supply dynamic IP addresses to your client workstations. Normally, you would accept the default On so that workstations on your LAN can have IP addresses assigned dynamically from the router. 8. The IP address server will provide 100 IP addresses automatically to workstations on your LAN.
6-12 Getting Started Guide The Router will restart and your configuration settings will be activated. You can then Exit or Quit your Telnet application. Easy Setup is now complete.
Technical Specifications and Safety Information -1 Appendix A Technical Specifications and Safety Information Description Dimensions: 124.0 cm (w) x 20.0 cm (d) x 5.3 cm (h) 9.4” (w) x 7.9” (d) x 2.1” (h) Communications interfaces: The Netopia 4522 T1 Router has an RJ-48 jack for the T1 connection; an RJ-45 10/100Base-T Ethernet port for your LAN connections; and a DB-9 Console port. Power requirements ■ 12 VDC input ■ 1.
-2 Getting Started Guide December 1, 2000 ■ Canada – CSA: CAN/CSA-C22.2 No. 950-95 EMI: ■ FCC Part 15 Class B ■ FCC Part 68 Regulatory notices Warnings This is a Class B product. In a domestic environment this product may cause radio interference, in which case the user may be required to take adequate measures. Adequate measures include increasing the physical distance between this product and other electrical devices.
Technical Specifications and Safety Information -3 Items (b) and (d) are indicated on the label. The Ringer Equivalence Number (REN) is used to determine how many devices can be connected to your telephone line. In most areas, the sum of the REN's of all devices on any one line should not exceed five (5.0). If too many devices are attached, they many not ring properly. Service Requirements. In the event of equipment malfunction, all repairs should be performed by our Company or an authorized agent.
-4 Getting Started Guide Important safety instructions Caution ■ Depending on the power supply provided with the product, either the direct plug-in power supply blades, power supply cord plug or the appliance coupler serves as the mains power disconnect. It is important that the direct plug-in power supply, socket-outlet or appliance coupler be located so it is readily accessible.
Limited Warranty and Limitation of Remedies-Revised January 2002 Limited Warranty and Limitation of Remedies-Revised January 2002 Netopia warrants to you, the end user, that the Netopia 4522™ T1 Router (the “Product”) will be free from defects in materials and workmanship under normal use for a period of two (2) years from date of purchase.