SAFETY PRECAUTIONS + Presence of ive parts Inside the device! Do not open. Risk of electric shield * No parts should be repaired by users. + Pace the device on a flat, firm, and stable surface. Do not put It on a carpet or rug + Place the device in 2 well-ventilated location to prevent the accumulation of internal heat. + Protract tha device from high temperatures, humidity, water, and dust. + Do not place any objects near your advice that may damage it (eg. liquidated objects or candies).
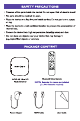
poe Sl Prows LED USB Port Sims — Reset Button USB Port. Front Panel Side Panel HOM Huck Panel BLUETOOTH REMOTE Sandy On/Off © B Input Phantasmagoria.
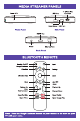
QUICK INSTALLATION STEPS Please refer to the below Instructions to connect your NOVA Media Screamer to your TV, Po war, Network, and other devices. ? STEP 1 Connect the HDMI cable to the HDMI port of the NOVA Media Reamer and your TV. STEP 2 — Connect the NOVA Media Streamer to power using the power adapter provided. The NOVA Media Streamer will automatically start afar the parer Is switched on. STEP 3 — Switch your TV's Input source to HDMI.
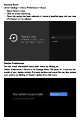
You may turn on your device after properly connecting all hardware. To be able to use Google Assistant on your remote, you must first pair your Bluetooth Remote to your NOVA Media Streamer. Follow the pairing Instructions on screen. STEP 1: LANGUAGE Sal act your preferred language on tha Welcome Page.
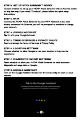
STEP 2: SET UP WITH ANDROID™ DEVICE Choose whether to set up your NOVA Media Streamer with an Android device or skip this step. If you select “Continue”, please follow the quick setup instructions. STEP 3: WIFI Connect the NOVA Media Streamer to your WI-Fi Network If you have already connects via Ethernet, you will be prompted to continue or change your network. STEP 4: GOOGLE ACCOUNT Sign in with your Google Account. STEP 5: TERMS OF SERVICE & PRIVACY POLICY.
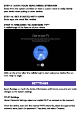
STEP 9: NAME YOUR NOVA MEDIA STREAMER Select from the options provided or enter a custom name to easy identify your device when paling to other devices. STEP 10: GET STARTED WITH APPS Sal act apps you would like installed. STEP 11: WELCOME TO ANDROID TV™ A walk through of the features of your device. Click on the arrow after the walk through to start using your device. You are now ready to begin. Select Settings to check the device information, add/remove accounts, and make changes to the system settings.
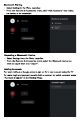
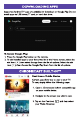
DOWNLOADING APPS Supported Android TV apps are available for download on Google Play. Do not Install apps via USB driver, TF card, or hard disk drive. To Access Google Play: 1. Press the Google Play button on the remote. 2. To add installed apps to your favorites list in the Home screen, select the add icon ( +) then select the app from the list of options. Select the add icon {+ ), then choose the Google Play Store from the list of options.
“ Cast from Google Chrome This device has Chrome cast cast from your PC/Laptop, open Google Chrome, dick the Settings icon 1 located on the top right corner of the browser, then click “Cast”. GOOGLE ASSISTANT Do more on your TV with your vole. Ask Google to search for the latest blockbuster, stream shows, or open multiplier games. Have ft dim the lights by connecting smart home devices. Manage tasks and see your calendar. Or ask it questions and see the answers on your TV.
TROUBLESHOOTING Issue: No display after prows on Possible Reason: The power cord is not properly connected, or your TV input is not set to HDMI. Solution: 1. Ensure the device is connected to the power and that the parer cord is connected to the correct port on the device. 2. Marks sure that HDMI Is selected as your TV Input. Issue: No sound Possible Reason: Tha advice is on Mut, or tha volume is too low. Solution: Crass the mute button to restore tha sound and increase the volume.
Ensue: Vole control on remote Is not working Possible Reason: Remote is not paired to the Media Streamer. Solution: See the Pairing Bluetooth Devices section in this guide. Issue: No audio Possible Reason; Audio Ratting not. configured correctly for your TV. Solution: Go to Settings > Surround > Surround Sound and choose PCM. Imported and distributed by No logy (Pty) Ltd in Southern Africa. For device support visit wersretugrcaaaisgpport.