R netis Wireless High Power Ceiling/Wall Mounted Outdoor AP Router Quick Installation Guide Model No.
netis Wireless High Power Ceiling/Wall mounted AP Router Quick Installation Guide 1.
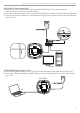
netis Wireless High Power Ceiling/Wall mounted AP Router Quick Installation Guide 1)WF2520P (Power source:PoE) A) Connect one end of the Ethernet cable into the WAN/PoE port of the device and the other end to the PoE port of the PoE injector. B) Connect the Power Adapter to DC-in port of the PoE injector and plug the other end to wall outlet. C) Connect the Ethernet cable into LAN/WAN port of PoE injector and the other end to the Ethernet port of the PC.
netis Wireless High Power Ceiling/Wall mounted AP Router Quick Installation Guide 3) WF2520 (Power source:PoE switch) A) Connect one end of the Ethernet cable into the WAN/PoE port of the device and the other end to the Ethernet port of PoE switch. B) Connect one end of the Ethernet cable into an Ethernet port of the PoE switch and the other end to the Ethernet port of PC. WF2520 PoE switch 3.
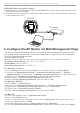
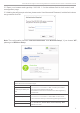
netis Wireless High Power Ceiling/Wall mounted AP Router Quick Installation Guide 3.2 Open your browser and type http://192.168.1.1 in the address field to visit router's web management page. 3.3 A dialog box will prompt as below, please enter User Name and Password, both default values are guest and click OK. Note: The configuration includes “Internet Connection” and “Wireless Setup”, if you choose “AP”, please go to Wireless Setup. AP Router Mode: Select the correct Connection Type.
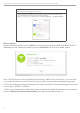
netis Wireless High Power Ceiling/Wall mounted AP Router Quick Installation Guide WISP Mode : Select target network and Connection Type. 1. Click “AP Scan” button to select your target network and click “Connect” button. 2. Type in the wireless security info of the target network. 3. Select connection type.
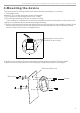
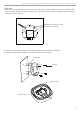
netis Wireless High Power Ceiling/Wall mounted AP Router Quick Installation Guide 4.Mounting the device This device can be ceiling mounted or wall mounted according to your setup. 1. Ceiling Mounted Attention: For ceiling mounted, we would suggest, (1) The thickness of ceiling must be over 17mm (2) The Weight-bearing of ceiling must be over 5kg. If the ceiling do not meet the requirement as above, please add a plate on the back of the ceiling to strengthen the thickness and weight-bearing.
netis Wireless High Power Ceiling/Wall mounted AP Router Quick Installation Guide 4) Connect the Ethernet cable to the WAN/PoE port of the device 5) Reinstall the ceiling and mount the device by fixing the device to the slot of mounting bracket.
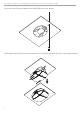
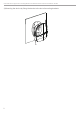
netis Wireless High Power Ceiling/Wall mounted AP Router Quick Installation Guide 2 Wall Mout 1) Place the mounting kit on the wall and mark four holes of the bracket on the wall,and then drill four holes on the wall. Please note that the U-shaped notch must be consistent with the actual direction of the network. Marking four holes of the bracket on the wall. 2) Attach the mounting bracket to the wall by using the provided mounting kit.
netis Wireless High Power Ceiling/Wall mounted AP Router Quick Installation Guide 4) Mounting the device by fixing the device to the slot of mounting brackets.
5.Troubleshooting Q How do I restore my netis WF2520/WF2520P to default settings? A With the router powered on, holding “RESET” button on the PoE injector or the device for 8s~10s with a pin to restore it to factory defaults. Q What can I do if my Internet cannot be accessed? A 1) Check to verify the hardware connections are correct. Please refer to the “Hardware Connection” step. 2) Refer to 3.1) to set a Static IP address for your PC and connect the WF2520/WF2520P to your PC.