WF-2405 User Manual V1.
WF-2405 User Manual Certification FCC CE FCC Statement This equipment has been tested and found to comply with the limits for a Class B digital device, pursuant to part 15 of the FCC rules. These limits are designed to provide reasonable protection against harmful interference in a residential installation. This equipment generates, uses and can radiate radio frequency energy and, if not installed and used in accordance with the instructions, may cause harmful interference to radio communications.
WF-2405 User Manual Package Contents The following items should be found in your package: WF-2405 Power adapter Quick Installation Guide CD-Rom Ethernet cable Make sure that the package contains above items. If any of the above items is missing or damaged, please contact the store you bought this product from. Brand and Copyright Announcement Copyright © 2010 Netis Corporation. All rights reserved is a registered trademark of Netis Corporation.
WF-2405 User Manual Contents CONTENTS...................................................................................................................................... 3 1. 2. 3. INTRODUCTION .................................................................................................................... 6 1.1. PRODUCT OVERVIEW .......................................................................................................... 6 1.2. MAIN FEATURES ........................................
WF-2405 User Manual 3.6. 3.6.1. Wireless Settings ...................................................................................................... 28 3.6.2. Wireless Security ..................................................................................................... 29 3.6.2.1. None ................................................................................................................................ 29 3.6.2.2. WEP ..........................................................
WF-2405 User Manual 5. 6. 4.4. WPS SETTINGS................................................................................................................. 51 4.5. NETWORK ........................................................................................................................ 51 4.6. DHCP .............................................................................................................................. 51 4.7. SYSTEM TOOLS................................................
WF-2405 User Manual 1. Introduction 1.1. Product Overview WF-2405 is dedicated to Small Office/Home Office (SOHO) Wireless network solution. The ability to be powered through a USB connection when power outlets are scarce, compact design, and included travel bag all further the device's ability to deliver networking with a very high degree of mobility. It provides up to 150Mbps data transmission rate in 2.4GHz frequency, complies with IEEE 802.11n, IEEE 802.11g and IEEE802.
WF-2405 User Manual IEEE 802.11k IEEE 802.11i IEEE 802.3 10Base-T IEEE 802.3u 100Base-TX 1.4.
WF-2405 User Manual 2. Hardware Installation 2.1. System Requirement Minimum Requirements: Broadband (DSL/Cable) modem and service with Ethernet port 802.11n b/g/n wireless adapter or Ethernet adapter and cable for each computer Internet Explorer® 5.0, Firefox® 2.0 or Safari® 1.4 or higher 2.2.
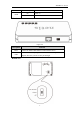
WF-2405 User Manual Flashing PWR Normal On Power on Off Power off Side view Figure 2-2 Description RJ45 USB Function Connect to ADSL/Cable modem or other network device Connect to Power adapter, please don‟t use the unknown power adapter, otherwise your device may be damaged.
WF-2405 User Manual Description DEFAULT WPS AP-Router Client AP Function Restore factory configuration Enable WPS setting Switch to AP-Router mode Switch to Client mode Switch to AP mode 2.3. How to Restore factory configuration If the router ever freezes in a setting change process or if you can‟t access it because you can‟t remember the IP you have given it or other problem, you may have to utilize the reset button on the back of the router to put it back to factory settings.
WF-2405 User Manual Figure 2-3 2.4.2. Client mode The device work as a wireless card under this mode. Computer connect to RJ45 of WF-2405 via cable, then use WF-2405 to search and connect other AP or AP-Router. Please connect your device as figure 2-4.
WF-2405 User Manual Figure 2-4 2.4.3. AP mode The device work as an access point under this mode. RJ45 of WF-2405 connect to other broadband device(switch or router), then wireless client can connect to WF-2405 to access the internet. Please connect your device as figure 2-5.
WF-2405 User Manual Figure 2-5 3. How to configure AP-Router mode 3.1. Login web management page Connect your device following the network topology in figure 2-3, then configure your computer follow procedures below. 1) Select “My Network Places” on the desktop, right click, then choose “Properties”.
WF-2405 User Manual 2) Figure 3-1 Select “Wireless Network connection”, right click, then choose “Properties”. 3) Figure 3-2 Select “Internet Protocol[TCP/IP]”, double click.
WF-2405 User Manual 4) Figure 3-3 Choose “Obtain an IP address automatically” and “Obtain DNS server address automatically”, then click “OK”. 5) Figure 3-4 Return to network connection window, choose “Wireless Network connection”, right click, then choose “View Available Wireless Networks”.
WF-2405 User Manual 6) 7) Figure 3-5 Click “Refresh network list”, select SSID “netis” and double click. Figure 3-6 Open the web browser, enter “192.168.1.1” in the address bar. Then enter the User name “guest” and Password “guest” in the dialog box, click OK.
WF-2405 User Manual Figure 3-7 If you can see the picture as below(figure 3-8), that means you have successfully login web management page of WF-2405. You can start configuring your WF-2405 now. Figure 3-8 3.2. Status This feature provides running status information and detailed information about router. 3.2.1. Version Show the hardware version and firmware version. Figure 3-9 3.2.2.
WF-2405 User Manual Figure 3-10 Connection Type: Display router‟s current connection type, It should be one of “PPPoE”, “DHCP”, “Static IP”, depending on what kind of connection type your ISP provides. Physical Address: The physical address of WAN port, this is a unique address assigned by manufacturer. IP Address: The IP address you obtained after connect to the Internet, if you haven‟t connected to the Internet yet, this field is 0.0.0.0.
WF-2405 User Manual 3.2.4. Wireless This item provides current running information of wireless. Figure 3-12 Wireless status: Display wireless interface status is enabled or not Name (SSID): SSID (Service Set Identifier) is your wireless network's name shared among all points in a wireless network. Mode: Current wireless mode of wireless router Channel: Display current channel of your wireless router.
WF-2405 User Manual Figure 3-14 3.3. Quick Setup Providing you the convenient and simplest method for configure the router, the purpose of this item is to provide an easy way for you to use it and configure your router to access the Internet quickly; including „DHCP(dynamic)‟, „PPPoE‟, „Static‟ and „Wireless Configuration‟. This is the most convenient tool for you to configure router. 3.3.1.
WF-2405 User Manual 3.3.3. Static Figure 3-17 This item should only be used when users use a static IP address to access Internet, you should input your “WAN IP address”, ”subnet mask”,” default gateway” and “DNS server (domain name server)” according to the information provided by your ISP. And every IP address should be input in appropriate IP field, a IP address only divided into four IP octets by sign“.” is acceptable.
WF-2405 User Manual points in a wireless network. The SSID must be identical for all devices in the wireless network. It is case-sensitive and must not exceed 32 characters. Make sure all points in the wireless network have the same SSID. For added security, you should change the default SSID to a unique name. Region: Choose a correct region which fit your use environment.
WF-2405 User Manual 3.4.1. WPS Settings Figure 3-20 WPS Status: You can use this function to setup the wireless connection between this router and wireless network card. The default is Enable. AP PIN Code: This code can mark a wireless product. Add A New Device: Add a new device by WPS. 3.4.2. Add a New Device Figure 3-21 Enter the new device‟s PIN: This code can mark a wireless product. Press the button of the new device in two minutes: New device will send a PIN code to wireless router.
WF-2405 User Manual Method 2: 1. Input the PIN code of the adapter‟s WPS page into the router‟s WPS configure page, then click ‟connect‟ Figure 3-23 Figure 3-24 2. Push the „PIN Input Config (PIN)‟ in the Wi-Fi protect setup of the adapter Figure 3-25 3. Select this router in the pop-up window, then click „Select‟ 4. The connection between the adapter and the router is be established automatically. Method 3: 1.
WF-2405 User Manual 3.5.1.1. Wired Access Figure 3-26 Internet Access Type: Ask for your ISP to get the correct access type. IP: The IP address you obtained after connect to the Internet, if you haven‟t connected to the Internet yet, this field is 0.0.0.0. Subnet Mask: The Subnet mask you obtained after connect to the Internet, if you haven‟t connected to Internet yet, this field is 0.0.0.0.
WF-2405 User Manual 3.5.1.2. Wireless Access Figure 3-27 SSID: SSID: SSID (Service Set Identifier) is your wireless network's name shared among all points in a wireless network. The SSID must be identical for all devices in the wireless network. It is case-sensitive and must not exceed 32 characters. Make sure all points in the wireless network have the same SSID. For added security, you should change the default SSID to a unique name.
WF-2405 User Manual 3.5.2. LAN The IP address of LAN port is used for access router itself by computers that connect to the router directly; here you can set IP address you need. The IP address format is like ***.***.***.***, and default IP address is 192.168.1.1, the default subnet mask is 255.255.255.0. Figure 3-281 3.5.3. MAC Clone The WAN port of router has a unique MAC address assigned by manufacturer; it called as “Default MAC”.
WF-2405 User Manual Figure 3-30 3.6. Wireless 3.6.1. Wireless Settings Providing basic configuration items for wireless router users, including “wireless network status”, “SSID”, “Radio Band”, “Radio Mode”, “MAC”, “SSID broadcasting”, “Channel width”, “Channel sideband”, “Region” and “Channel” several basic configuration items.
WF-2405 User Manual login in, then user have to input the SSID value manually. Channel width: This switch allows you to set Router's wireless bandwidth. 20MHz: In this mode you can get low bandwidth, little interference and slow rate. 40MHz: In this mode you can get high bandwidth, high interference and rapid rate. Use only when you have a pure router, draft 802.11n wireless network. Channel sideband: It controls your wireless router use higher or lower channel when working on 40MHz.
WF-2405 User Manual more bits password have, the better security wireless network is, at the same time the speed of wireless is more slower. Key Mode: If you select WEP to encrypt your data, choose the bits of password, it should be 64 bits or 128 bits. Then choose the format of password; it should be HEX or ASCII. The valid character for HEX format should be numbers from 0 to 9 and letters from A to F. HEX support mixed letter and number mode. And ASCII supports all characters that in keyboard.
WF-2405 User Manual Figure 3-35 3.6.2.5. WPA/WPA2-PSK This item mixed WPA-PSK and WPA2-PSK mode, which provides higher security level; you can configure it according with WPA-PSK or WPA2-PSK.
WF-2405 User Manual 3.6.3. Wireless MAC Filtering Figure 3-37 MAC Filter Status: the default is disable. You can filter wired users by enabling this function; thus unauthorized users can not access the network. Description: describe MAC Filter list to tell from different MAC Filter lists. Rule: you can select permit or deny. The default is permit. MAC address: input the MAC address that you want to control. The default format is **-**-**-**-**-**(e.g.: 00-22-33-da-cc-bb).
WF-2405 User Manual Figure 3-38 Authentications type: The default is set to “Auto”, which allows “Open System” or “Shared Key” authentication to be used. Select “Shared Key” if you only want to use “Shared Key” authentication (the sender and recipient use a WEP key for authentication). Beacon Interval: The interval time of this 150Mbps Wireless-N Broadband Router broadcast a beacon. Beacon is used to synchronize the wireless network. The valid interval is 20-1000, the default is 100.
WF-2405 User Manual Preamble Type: "Short Preamble" is suitable for heavy traffic wireless network. "Long Preamble" provides much communication reliability; the default setting is "Long Preamble”. 3.6.5. Wireless Statistics Display current status of the wireless client associate with AP. Figure 3-39 3.7. DHCP 3.7.1. DHCP Settings Figure 3-40 DHCP Server Status: Keep the default setting “Enable”, so router is able to use DHCP function.
WF-2405 User Manual Figure 3-41 3.7.3. Address Reservation Figure 3-42 Address Reservation: reserve IP address for designed physical address host. If you want to configure a fixed IP address for some host, please input physical address and IP address, then click add. 3.8. Forwarding 3.8.1. Virtual Servers Figure 3-43 Description: Describe current virtual server item.
WF-2405 User Manual Internal Host IP Address: The “Internal Host IP Address” indicates IP address of the internal host using virtual server. Protocol: The protocol item supplies several protocols. For example, if you have web server within LAN, you can select the HTTP template then the router will input port number 80 automatically. External Port: Input an extranet port number (the users in Internet can see these ports). Internal Port: Input an intranet port number. 3.8.2.
WF-2405 User Manual Figure 3-45 3.8.4. UPnP The UPnP function supports load Application‟s port forward record automatically. Select “Enable” to enable this function. Figure 3-46 3.8.5. FTP Private Port Some games, servers, and applications (such as BT, QQ video, Edunkey, Web server) are no longer effect when behind the NAT router, so this item provides function of port mapping from LAN to WAN. Figure 3-47 3.9. Security 3.9.1.
WF-2405 User Manual tunnel, the router supports IPSEC pass-through, PPTP pass-through and L2TP pass-through. Figure 3-48 3.9.2. IP Address Filtering Figure 3-49 Status: the default is disable. The rules of “Internet access control” based on source IP, port number and protocol. Description: describe IP Firewall list to tell from different IP Firewall lists. Rule: you can select permit or deny. The default is permit. Source IP address: input the source IP address that you want to control.
WF-2405 User Manual Follow the following steps to set Internet Access Control: 1. You can select “enable” and click “Save” to enable “IP Firewall” function. This is only the first step, you should continued to create appropriate rules for “IP Firewall”. 2. Input description information for current access control rule in the “Description” field. Input IP address of host you want to restrict. 3.
WF-2405 User Manual 2. Add MAC address you want to control in the “MAC address” field (the format is **-**-**-**-**-**), then click “Add” button, and you will see the MAC address has displayed in the MAC list. 3. There are two items supplied, “Permit wireless connection for MAC address listed (others are Denied)” and “Deny wireless connection for MAC address listed (others are Permitted)”, Select the item you want, and click “Save” button. 3.9.4.
WF-2405 User Manual to delete it. 3.10. Static Routing Most of broadband router and wireless router are using NAT mode, so this feature is designed for most common network environment. Figure 3-52 Destination Network or IP Address: Specify a certain destination Network or IP address which static route forward to. Subnet Mask: Subnet mask is used for distinguish Network portion and Host portion for an IP address.
WF-2405 User Manual 3.11. QOS Settings Figure 3-53 Status: QOS switch. Automatic Uplink Speed: Router adjusts uplink bandwidth automatically. Manual Uplink Speed (Kbps): User configures uplink bandwidth manually. IP Address: Set the IP address range for restricted hosts. Minimum bandwidth: setup uplink and downlink bandwidth. Maximum bandwidth: setup uplink and downlink bandwidth. 3.12. Dynamic DNS The DDNS feature allows you using domain name (not IP address) to access Internet.
WF-2405 User Manual Figure 3-54 DDNS Status: Current status of DDNS server. DDNS Server Provider: For example, if you want to use service of “roay.cn”, you have to first register and accounts for it. Other DDNS service providers as the same. Username, Password, Dynamic Domain Name: After register an DDNS account from DDNS service providers, you will get “User Name”, “Password”, ”Dynamic Domain Name”, Input information in appropriate field. 3.13.
WF-2405 User Manual Figure 3-56 3.13.3. Password The default username/password is guest/guest. To ensure the Router‟s security, it is suggested that you change the default password to one of your choice, here enter a new password and then Re-enter it again to confirm your new password. Click “Save” button to save settings. Figure 3-57 3.13.4. WOL Input host MAC address, and then click button of "Wake up" to wake up the target host which in the LAN. Figure 3-58 3.13.5. System Logs Examine system logs.
WF-2405 User Manual Figure 3-59 3.13.6. Remote Management WEB Management Status: the default is disable. Router can be accessed on the remote site using “Web setup”. Check the “Management Port” and enter the port number and then press “save” button to enable web management. Figure 3-60 3.13.7. Factory Defaults Click "Restore" button, the Router will erase all of your settings and replace them with the factory defaults, make sure you have backup current settings before click this button. Figure 3-61 3.
WF-2405 User Manual system parameter setting from a old parameter file. Figure 3-63 3.14. About This item shows company information of netis. If you want more information about netis, please access this website http://www.netis-systems.com/ Figure 3-64 4. How to configure Client mode 4.1. Login web management page Note: The DHCP server is disable under client mode, so you need to configure a static IP address for WF-2405, then you can login the web page of the device.
WF-2405 User Manual 2) Figure 4-1 Select “Local Area connection”, right click, then choose “Properties”. 3) Figure 4-2 Select “Internet Protocol[TCP/IP]”, double click.
WF-2405 User Manual 4) 5) Figure 4-3 Select “Use the following IP address” and input IP address “192.168.1.214”, input Subnet mask “255.255.255.0”, then choose “Obtain DNS server address automatically”, then click “OK”. Figure 4-4 Open the web browser, enter “192.168.1.100” in the address bar.
WF-2405 User Manual name “guest” and Password “guest” in the dialog box, click OK. Figure 4-5 If you can see the picture as below(figure 4-6), that means you have successfully login web management page of WF-2405. You can start configuring your WF-2405 now. Figure 4-6 As you can see, when the device works under client mode, there are 7 items in the web page. These items have already been described in AP-Router mode, so you can refer to corresponding item in chapter 3. Please pay attention on chapter 4.
WF-2405 User Manual 2) 3) Figure 4-7 You can see several SSID of the AP or AP-Router like figure 4-10, select the SSID that you want to connect, click “Connect” button. Here we use “netis SZ” for example. Figure 4-8 If AP has been encrypted, you need configure the wireless security for WF-2405. When configuring wireless security, please make sure authentication type and the key is same as AP‟s setting.
WF-2405 User Manual 4) After finishing configure WF-2405, please return to your computer to change the IP address. You can use static IP or obtain an IP automatically. Figure 4-10 4.3. Status Please refer to chapter 3.2 . 4.4. WPS Settings Please refer to chapter 3.4 . 4.5. Network Please refer to chapter 3.5 . 4.6. DHCP Note: When the device works under client mode, it acts like a wireless adapter, don‟t need to change this option.
WF-2405 User Manual 4.8. About Please refer to chapter 3.14 . 5. How to configure AP mode 5.1. Login web management page Note: The DHCP server is disable under AP mode, so you need to configure a static IP address for WF-2405, then you can login the web page of the device. Connect your device following the network topology in figure 2-5, then configure your computer follow procedures below. 1) Select “My Network Places” on the desktop, right click, then choose “Properties”.
WF-2405 User Manual 3) 4) Figure 5-2 Select “Internet Protocol[TCP/IP]”, double click. Figure 5-3 Select “Use the following IP address” and input IP address “192.168.1.214”, input Subnet mask “255.255.255.0”, then choose “Obtain DNS server address automatically”, then click “OK”.
WF-2405 User Manual 5) Figure 5-4 Open the web browser, enter “192.168.1.100” in the address bar. Then enter the User name “guest” and Password “guest” in the dialog box, click OK. Figure 5-5 If you can see the picture as below(figure 5-6), that means you have successfully login web management page of WF-2405. You can start configuring your WF-2405 now.
WF-2405 User Manual Figure 5-6 As you can see, when the device works under client mode, there are 7 items in the web page. These items have already been described in AP-Router mode, so you can refer to corresponding item in chapter 3. 5.2. Status Please refer to chapter 3.2 . 5.3. WPS Settings Please refer to chapter 3.4 . 5.4. Network Please refer to chapter 3.5 . 5.5. Wireless Please refer to chapter 3.6 . 5.6. DHCP Note: When the device works under AP mode, don‟t need to change this option.
WF-2405 User Manual 5.7. System Tools Please refer to chapter 3.13 . 5.8. About Please refer to chapter 3.14 . Note: After finishing configure WF-2405, please return to your computer to change the IP address. You can use static IP or obtain an IP automatically. Figure 5-7 6. Troubleshooting 6.1. I cannot access the Web-based Configuration Utility from the Ethernet computer used to configure the router. Check that the LAN LED is on.
WF-2405 User Manual 6.2. I forget Password (Reset the Router without Login) Use a pencil to press the button for about 2-6 seconds when it is working, then leave your hands, it will restore settings to the factory configuration. The default password is guest. 6.3. I have some problems related to Connection with Cable Modem Please follow the following steps to check the problems: Check whether the DSL modem works well or the signal is stable.
WF-2405 User Manual 150Mbps Wireless-N Broadband Router. Ensure that the wireless adapter‟s TCP/IP settings are correct as required by your network administrator. If you are using a 802.11b wireless adapter, and check that the 802.11G Mode item in Wireless Basic Setting page, is not configured to use 802.11G Performance. Use the ping command to verify that the wireless client is able to communicate with the router‟s LAN port and with the remote computer.