
Operation Manual


Using NETGEAR genie
26
Powerline 500 WiFi Access Point (XWN5001)
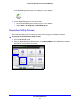
To set the encryption key:
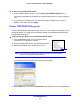
1. On the Powerline Utility screen, right-click the Powerline device icon or click the Security
icon.
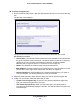
The Security screen displays.
The top section of the Security screen shows information about each device that
NETGEAR genie detects.
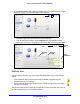
• Device
Name. This lists the Powerline devices that are detected on the network after
the genie completes a scan for devices. The device name is shown as un-named by
default, but you can change it to a descriptive name such as Office or Master
Bedroom (see Change the Name of a Powerline Device o
n page 24).
• Model. T
his identifies the model number of the Powerline device.
• MAC Address. The MAC
address for the Powerline device. This information is on the
product label, which might not be visible when the device is plugged in.
• Devic
e Password. To change settings for a remote Powerline device, you have to
enter its password. The device password is on the product label.
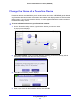
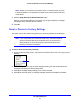
2. Select the check box
next to each device for which you want to set the encryption key.
3. In
Step 2 on your screen, select the option that you want:
• Create a
new Encryption Key. To set your own (private) network encryption key,
type your network encryption key in the field.
• Use d
efault Encryption Key. When you select this option, the factory default
encryption key automatically displays in the field. The default network encryption key
is HomePlugAV.