
User Manual


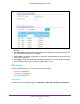
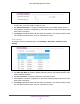


Table Of Contents
- M6100 Web Management User Guide
- Contents
- 1. Getting Started
- 2. Configuring System Information
- 3. Configuring Switching Information
- 4. Routing
- 5. Configuring Quality of Service
- 6. Managing Device Security
- 7. Monitoring the System
- 8. Maintenance
- 9. Help
- A. Default Settings
- B. Configuration Examples
- C. Notification of Compliance

Configuring Switching Information
149
M6100 Web Management User Guide
Setting the VLAN Priority Tag/DSCP sets the QoS profile which determines the egress
queue to which the frame is mapped. The switch default setting for egress queues
scheduling is Weighted Round Robin (WRR). Complete the QoS setting by configuring
the relevant ports to work in other scheduling and queue management modes via the
Class of Service settings. Depending on the platform, these choices may include strict
priority for the queue used for iSCSI traffic. The downside of strict priority is that, in
certain circumstances (under heavy high priority traffic), other lower priority traffic may get
starved. In WRR, the queue to which the flow is assigned to can be set to get the required
percentage.
3. Configure the global traffic class mapping in Class of Service. The global traffic class
mapping configuration determines the traffic class used to transmit iSCSI packets. The traffic
mapping configuration options are:
• IEEE 802.1P
• IP-DSCP
The configuration of the CoS component determines changes in the mapping of IEEE
802.1p or IP-DSCP values to traffic classes. For more information, see
Class of Service
on page 370.
4. Select the VLAN Priority Tag from the menu to assign the iSCSI session packets. The range
is 0 to 7. The default is 5.
5. Select the DSCP value from the menu to assign iSCSI session packets. The range is 0 to
63. The default is 46.
6. Use the Remark field to Enable or Disable the marking of iSCSI frames with the configured
VLAN Priority Tag/DSCP when egressing the switch. Enabling Remark updates the packets
with IEEE 802.1p or IP-DSCP values. Remarking packets with priority data provides special
QoS treatment as the packets continue through the network. Remark is enabled by default.
7. Configure the iSCSI Aging Time — the number of minutes a session must not be active prior
to it’s removal. iSCSI Aging Time must be a whole number in the range of 1 to 43200
minutes. The default is 10 minutes.
8. Click Apply to send the updated configuration to the switch. Configuration changes take
effect immediately.
9. Click Cancel to cancel the configuration on the screen and reset the data on the screen to
the latest value of the switch.