
User Manual
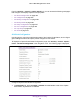
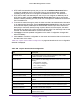


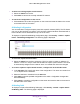
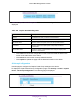

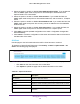
Table Of Contents
- M6100 Web Management User Guide
- Contents
- 1. Getting Started
- 2. Configuring System Information
- 3. Configuring Switching Information
- 4. Routing
- 5. Configuring Quality of Service
- 6. Managing Device Security
- 7. Monitoring the System
- 8. Maintenance
- 9. Help
- A. Default Settings
- B. Configuration Examples
- C. Notification of Compliance

Managing Device Security
466
M6100 Web Management User Guide
To delete an existing Captive Portal instance:
1. Select the CP ID from the list.
2. Click Delete to remove the currently selected CP instance.
To cancel the configuration on the screen:
1. Click Cancel to cancel the configuration on the screen and reset the data on the screen
to the latest value of the switch.
CP Binding Configuration
You can associate a configured captive portal with a specific network (SSID). The CP feature
only runs on the interfaces you specify. A CP can have multiple interfaces associated with it,
but an interface can be associated to only one CP at a time.
To display the Captive Portal Binding Configuration page, click Security
Control Captive
Portal
CP Binding Configuration. The following page is displayed.
To select the Captive Portal instance:
1. Select the CP ID from the list to select the CP ID for which to create or update a CP
instance.
The ID is a unique value that identifies the captive portal instance. This value
is automatically assigned to the instance when it is created and cannot be changed.
To create or update a Captive Portal instance, configure the desired fields below:
1. In the CP Name field, specify the name of the configuration.
The name can contain from
1 to 31 alphanumeric characters.
2. Select the interface or interfaces from the Port List.
3. Click Apply to send the updated configuration to the switch. Configuration changes take
ef
fect immediately.
4. Click Cancel to cancel the configuration on the screen and reset the data on the screen to
the latest value of the switch.
CP Binding Table
To display the Captive Portal Binding Table page, click Security Control Captive Portal
CP Binding Table. The following page is displayed.