
User Manual

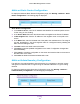
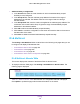
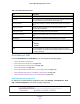

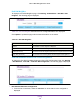
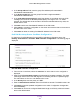

Table Of Contents
- M6100 Web Management User Guide
- Contents
- 1. Getting Started
- 2. Configuring System Information
- 3. Configuring Switching Information
- 4. Routing
- 5. Configuring Quality of Service
- 6. Managing Device Security
- 7. Monitoring the System
- 8. Maintenance
- 9. Help
- A. Default Settings
- B. Configuration Examples
- C. Notification of Compliance

Routing
351
M6100 Web Management User Guide
PIM Candidate RP Configuration
1. From the list of interfaces, select the Interface for which data is to be configured or
displayed.
2. Enter the Group Address transmitted in Candidate-RP-Advertisements. If you enter an
IPv6 address, the format is Prefix/Prefix Length.
3. In the Group Mask field, enter the group address mask transmitted in
Candidate-RP-Advertisements
4. In the C-RP Advertisement
Interval, specify the duration in seconds at which the C-RP
messages are unicast to the Bootstrap Router (BSR). The range is from 1 to 16383
seconds. The default value is 60 seconds. If this field is submitted without any value, the
default value is used.
5. Click Add to add a new Candidate-RP
Address for the PIM router.
6. Click Cancel to cancel the configuration on the screen and reset the data on the screen to
the latest value of the switch.
7. Click Delete to delete an existing Candidate-RP
Address for the PIM router.
PIM Bootstrap Router Candidate Configuration
To display the Multicast PIM Bootstrap Router (BSR) Candidate Configuration page, click
Routing
Multicast PIM BSR Candidate Configuration. The following page is displayed.
PIM BSR Candidate Configuration
1. From the list of interfaces, select the Interface for which data is to be configured or
displayed.
2. Enter the C-BSR Hash Mask Length to be advertised in bootstrap messages.
This hash
mask length will be used in the hash algorithm for selecting the RP for a particular group.
The valid values are from 0 to 32. Default value is 30.
3. In the Priority field, enter the priority of C-BSR.
4. Enter the Advertisement Interval value of the C-BSR in seconds.
The default value is 60.
5. Click Apply to send the updated configuration to the switch. Configuration changes take
ef
fect immediately.
6. Click Delete to remove the configured Hash Mask Length, and Priority values and restore
them to the default values.