
User Manual


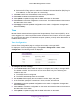

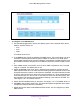

Table Of Contents
- M6100 Web Management User Guide
- Contents
- 1. Getting Started
- 2. Configuring System Information
- 3. Configuring Switching Information
- 4. Routing
- 5. Configuring Quality of Service
- 6. Managing Device Security
- 7. Monitoring the System
- 8. Maintenance
- 9. Help
- A. Default Settings
- B. Configuration Examples
- C. Notification of Compliance

Configuring System Information
37
M6100 Web Management User Guide
b. Select the EUI Flag option to enable the Extended Universal Identifier (EUI) flag for
IPv6 address, or clear the option to omit the flag.
9. Click Add to add a new IPv6 address to the service port interface.
10. Click Delete to delete the selected IPv6 address.
11. Click Update to update the page with the latest information on the switch.
12. Click Cancel to cancel the configuration on the screen.
This resets the data on the screen to
the latest value of the switch.
13. Click Apply to send the updated configuration to the switch. Configuration changes take
ef
fect immediately.
Time
M6100 Chassis switch software supports the Simple Network Time Protocol (SNTP). As its
name suggests, it is a less complicated version of Network Time Protocol, which is a system
for synchronizing the clocks of networked computer systems, primarily when data transfer is
handled via the Internet.
Time Configuration
Use the Time Configuration page to configure time locally or through SNTP.
To display the Time Configuration page, click System
Management > Time Time
Configuration. The following screen is displayed.
To configure the Time settings
1. In the Clock Source field, select the option to configure time locally or through SNTP
.
The default is SNTP. The local clock can be set to SNTP only if the following two
conditions are met:
a. The SNTP server is configured.
b. The SNTP last attempt status is successful.
2. Use the Date field to specify the current date in months, days, and years.
3. In the
Time field, specify the current time in hours, minutes, and seconds.
4. Click Apply to send the updated configuration to the switch. Configuration changes take
ef
fect immediately.
5. Click Cancel to cancel the configuration on the screen and reset the data on the screen to
the latest value of the switch.
6. Click Update to update the page with the latest information on the switch.