
User Manual


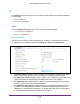

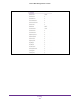

Table Of Contents
- M6100 Web Management User Guide
- Contents
- 1. Getting Started
- 2. Configuring System Information
- 3. Configuring Switching Information
- 4. Routing
- 5. Configuring Quality of Service
- 6. Managing Device Security
- 7. Monitoring the System
- 8. Maintenance
- 9. Help
- A. Default Settings
- B. Configuration Examples
- C. Notification of Compliance

Routing
212
M6100 Web Management User Guide
Route Configuration
To display the Route Configuration page, click Routing Routing Table Basic Route
Configuration.
Route Configuration
1. Select the Route T
ype from the menu. Possible values are:
• Default — To create a default route, all that needs to be specified is the Next Hop
Address, and Preference
• Static — To create a static route, specify the Network Address, Subnet Mask, Next
Hop
Address, and Preference.
• Static Reject — To create a static reject route, specify the Network Address, Subnet
Mask, and Preference.
2. Network Address displays the IP route prefix for the destination.
3. Subnet Mask indicates the portion of the IP interface address that identifies the attached
network.
This is also referred to as the subnet/network mask.
4. Next Hop IP
Address displays the outgoing router IP address to use when forwarding traffic
to the next router (if any) in the path towards the destination. The next router will always be
one of the adjacent neighbors or the IP address of the local interface for a directly attached
network.
5. Preference displays an integer value from (1 to 255).
The user can specify the preference
value (sometimes called “administrative distance”) of an individual static route. Among
routes to the same destination, the route with the lowest preference value is the route
entered into the forwarding database. By specifying the preference of a static route, the user
controls whether a static route is more or less preferred than routes from dynamic routing
protocols. The preference also controls whether a static route is more or less preferred than
other static routes to the same destination.
6. Use Description to specify the description of this route that identifies the route. Description
must consist of alpha-numeric, dash or underscore characters and have length in the range
from (0 to 31).
7. Click Add to add a new static route entry to the switch.
8. Click Delete to delete a existing static route entry from the switch.
9. Click Cancel to cancel the configuration on the screen and reset the data on the screen to
the latest value of the switch.
10. Click Apply to send the updated configuration to the switch. Configuration changes take
ef
fect immediately.