
User Manual


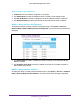
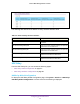
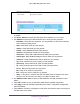

Table Of Contents
- M6100 Web Management User Guide
- Contents
- 1. Getting Started
- 2. Configuring System Information
- 3. Configuring Switching Information
- 4. Routing
- 5. Configuring Quality of Service
- 6. Managing Device Security
- 7. Monitoring the System
- 8. Maintenance
- 9. Help
- A. Default Settings
- B. Configuration Examples
- C. Notification of Compliance

Configuring System Information
68
M6100 Web Management User Guide
1. Use Admin Mode to enable or disable the UDP Relay on the switch. The default value
is disable.
2. Use Server Address to specify the UDP Relay Server
Address in x.x.x.x format.
3. Use UDP Port to specify the UDP Destination Port.
These ports are supported:
• DefaultSet - Relay UDP port 0 packets.
This is specified if no UDP port is selected
when creating the Relay server.
• dhcp -Relay DHCP (UDP port 67) packets.
• domain - Relay DNS (UDP port 53) packets.
• isakmp - Relay ISAKMP (UDP port 500) packets.
• mobile-ip - Relay Mobile IP (UDP port 434) packets
• nameserver - Relay IEN-1
16 Name Service (UDP port 42) packets
• netbios-dgm - Relay NetBIOS Datagram Server (UDP port 138) packets
• netbios-ns - Relay NetBIOS Name Server (UDP port 137) packets
• ntp - Relay network time protocol (UDP port 123) packets.
• pim-auto-rp - Relay PIM auto RP (UDP port 496) packets.
• rip - Relay Routing Image Protocol (RIP) (UDP port 520) packets
• tacacs - Relay
TACACS (UDP port 49) packet
• tftp - Relay
TFTP (UDP port 69) packets
• time - Relay time service (UDP port 37) packets
• Other - If this option is selected, the UDP Port Other V
alue is enabled. This option
permits a user to enter their own UDP port in UDP Port Other Value.
4. Use UDP Port Other V
alue to specify a UDP Destination Port that lies between 0 and
65535.
5. Click Add to create an entry in UDP Relay
Table with the specified configuration.
6. Click Apply to send the updated configuration to the switch. Configuration changes take
ef
fect immediately.
7. Click Cancel to cancel the configuration on the screen and reset the data on the screen to
the latest value of the switch.