
User Manual


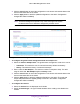
Table Of Contents
- M6100 Web Management User Guide
- Contents
- 1. Getting Started
- 2. Configuring System Information
- 3. Configuring Switching Information
- 4. Routing
- 5. Configuring Quality of Service
- 6. Managing Device Security
- 7. Monitoring the System
- 8. Maintenance
- 9. Help
- A. Default Settings
- B. Configuration Examples
- C. Notification of Compliance

Configuring System Information
79
M6100 Web Management User Guide
Use the buttons to perform the following tasks:
1. To configure DHCPv6 Relay for an interface, select the Interface with the information to
view or configure. You can either:
a. In the Go To Interface field, enter the interface in unit/slot/port format and click Go.
The entry corresponding to the specified interface will be selected.
b. Select the check box from the list of Interfaces configured for DHCPv6 Relay
functionality.
2. In the Admin Mode field, specify the DHCPv6 mode, either Enable or Disable, to configure
DHCPv6 Relay functionality. The default is Disable. DHCPv6 server and DHCPv6 relay
functions are mutually exclusive.
3. From the Relay Interface menu, select an interface to reach a relay server.
4. In the Destination IP Address, specify an IPv6 address to reach a relay server.
5. In the Remote ID field, specify the relay agent information option. The Remote ID needs to
be derived from the DHCPv6 server DUID and the relay interface number, or it can be
specified as a user-defined string.
6. Click Cancel to cancel the configuration on the screen and reset the data on the screen to
the latest value of the switch.
7. Click Apply to send the updated configuration to the switch. Configuration changes take
effect immediately.
Chassis
Use the Chassis screen to move the Primary Management Unit (Supervisor) functionality
from one blade to another. When applied, the entire chassis (including all interfaces in the
chassis) is unconfigured and reconfigured with the configuration on the new Primary
Management Unit. After the reload is complete, all chassis management capability must be
performed on the new Primary Management Unit. To preserve the current configuration
across a chassis move, save the current configuration to the nvram before performing the
chassis move. A chassis move causes all routes and Layer 2 addresses to be lost. The
system prompts the administrator to confirm the management move before the changes are
applied.
From the Chassis link, you can access the following pages:
• Basic Chassis Configuration on page 79
• Advanced Chassis Configuration on page 82
• NSF on page 92
Basic Chassis Configuration
To select the Management Unit:
1. Click System Chassis > Basic > Chassis Configuration.
2. Select the Management Unit. The Management Unit Selection field displays the Current
Primary Management Unit. You can change it by selecting another blade ID listed here.