
User Manual

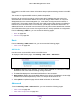
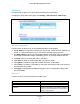
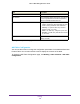
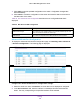

Table Of Contents
- M6100 Web Management User Guide
- Contents
- 1. Getting Started
- 2. Configuring System Information
- 3. Configuring Switching Information
- 4. Routing
- 5. Configuring Quality of Service
- 6. Managing Device Security
- 7. Monitoring the System
- 8. Maintenance
- 9. Help
- A. Default Settings
- B. Configuration Examples
- C. Notification of Compliance

Routing
259
M6100 Web Management User Guide
3. From the Send Version list, select the version of RIP control packets that the interface
should send. The value is one of the following:
• None — No RIP control packets will be sent.
• RIP-1 — Send RIP version 1 formatted packets via broadcast.
• RIP-1c — RIP version 1 compatibility mode. Send RIP version 2 formatted packets via
broadcast.
• RIP-2 — Send RIP version 2 packets using multicast. The default is RIP-2.
4. From the Receive Version list, select which RIP control packets the interface will accept.
The value is one of the following:
• RIP-1 — Accept only RIP version 1 formatted packets.
• RIP-2 — Accept only RIP version 2 formatted packets.
• Both — Accept packets in either format. The default is Both.
• None — No RIP control packets will be accepted.
5. Select Enable or Disable from the RIP Mode list. Before you enable RIP version 1 or
version 1c on an interface, you must first enable network directed broadcast mode on the
corresponding interface. The default value is disable.
6. Select the Authentication Type from the list. The types are:
• None — This is the initial interface state. If you select this option, no authentication
protocols will be run.
• Simple — If you select Simple, you will be prompted to enter an authentication key.
This key will be included, in the clear, in the RIP header of all packets sent on the
network. All routers on the network must be configured with the same key.
• Encrypt — If you select Encrypt, you will be prompted to enter both an
authentication key and an authentication ID. Encryption uses the MD5
Message-Digest algorithm. All routers on the network must be configured with the
same key and ID.
7. Enter the RIP Authentication Key for the specified interface. If you choose Authentication
Type None above, you will not be prompted to enter a key. If you choose Simple or
Encrypt, the key may be up to 16 octets long. The key value will only be displayed if you
are logged on with Read/Write privileges.
8. Click Apply to send the updated configuration to the switch. Configuration changes take
effect immediately.
9. Click Cancel to cancel the configuration on the screen and reset the data on the screen to
the latest value of the switch.
10. Click Update to update the page with the latest information on the switch.
Table 97, RIP Advanced Interface Configuration describes the non-configurable data that is
displayed.