
User Manual
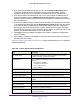


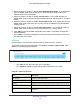
Table Of Contents
- M6100 Web Management User Guide
- Contents
- 1. Getting Started
- 2. Configuring System Information
- 3. Configuring Switching Information
- 4. Routing
- 5. Configuring Quality of Service
- 6. Managing Device Security
- 7. Monitoring the System
- 8. Maintenance
- 9. Help
- A. Default Settings
- B. Configuration Examples
- C. Notification of Compliance

Managing Device Security
464
M6100 Web Management User Guide
CP Configuration
By default, the switch has one captive portal. You can change the settings for that captive
portal, and you can also create and configure up to nine additional portals.
To display the Captive Portal Global Configuration page, click Security Control Captive
Portal
CP Configuration. The following page is displayed.
To add a Captive Portal instance, configure the desired fields below:
1. Enter the name of the configuration in the CP Name field.
The name can contain 1 to 31
alphanumeric characters.
2. In the Admin Mode list, select to Enable or Disable the administrative mode of the Captive
Portal feature. By default CP is disabled.
3. Select either HTTP o
r HTTPS as the Protocol the captive portal instances use for
communication with clients during the verification process.
• HTTP does not use encryption during verification.
• HTTPS uses the Secure Sockets Layer (SSL), which requires a certificate to provide
encryption.
The certificate is presented to the user at connection time.
4. Select the type of user V
erification that the captive portal instance performs with clients that
attempt to connect:
• Guest — The user does not need to be authenticated by a database.
• Local — The device uses a local database to authenticate users.
• RADIUS — The device uses a database on a remote RADIUS server to authenticate
users.
5. Select the Block status. If the CP is blocked, users cannot gain access to the network
through the CP
. Use this function to temporarily protect the network during unexpected
events, such as denial of service attacks.
6. If the V
erification Mode is Local or RADIUS, use the Group field to assign an existing User
Group to the captive portal. All users who belong to the group are permitted to access the
network through this portal. The User Group list is the same for all CP configurations on the
switch.
7. In the Idle T
imeout field, enter the number of seconds to wait before terminating a session.
A user is logged out once the session idle timeout is reached. If you set the value to 0, then
the timeout is not enforced. The valid range is 0 to 900 seconds. The default value is 0.