
User Manual
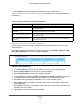


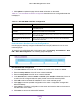
Table Of Contents
- M6100 Web Management User Guide
- Contents
- 1. Getting Started
- 2. Configuring System Information
- 3. Configuring Switching Information
- 4. Routing
- 5. Configuring Quality of Service
- 6. Managing Device Security
- 7. Monitoring the System
- 8. Maintenance
- 9. Help
- A. Default Settings
- B. Configuration Examples
- C. Notification of Compliance

Routing
357
M6100 Web Management User Guide
IPv6 PIM Interface Configuration
1. In the Go T
o Interface field, enter the interface in unit/slot/port format and click on the
Go button. The entry corresponding to the specified interface will be selected.
2. Select the check box beside the Interface for which data is to be configured or displayed.
3. In the Admin Mode field, select the Enable or Disable option to set the administrative
status of PIM-SM in the router
. The default is Disable.
4. In the Hello Interval field, enter the time in seconds between the transmission of PIM Hello
messages on this interface.
The valid values are from 0 to 18000. The default value is 30.
5. In the Join/Prune Interval, enter the frequency at which PIM Join/Prune messages are
transmitted on this PIM interface.
The valid values are from 0 to 18000. The default value is
60.
6. In the BSR Border field, select the Enable or Disable option to set the Bootstrap Router
(BSR) border status on the selected interface.
7. Enter the DR Priority for the selected interface.
The valid values are from 0 to 2147483647.
The default value is 1.
8. Click Apply to send the updated configuration to the switch. Configuration changes take
ef
fect immediately.
9. Click Cancel to cancel the configuration on the screen and reset the data on the screen to
the latest value of the switch.
Table 145, IPv6 PIM Interface Configuration describes the non-configurable data that is
displayed.
Table 145. IPv6 PIM
Field Description
Protocol State The state of PIM in the router — either operational or non-operational.
IPv6 Prefix/Length The IPv6 Address Prefix and the Length of the selected interface.
Designated Router The Designated Router on the selected PIM interface.
Neighbor Count The number of PIM neighbors on the selected interface.
Interface Configuration