
User's Manual


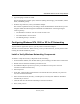


Table Of Contents
- NETGEAR Wireless Router Setup Manual
- Contents
- Chapter 1 About This Guide
- Chapter 2 Getting to Know Your NETGEAR Wireless Router
- Chapter 3 Connecting the Router to the Internet
- Prepare to Install Your Wireless Router
- First, Connect the Wireless Router to the Internet
- Now, Set Up a Computer for Wireless Connectivity
- Troubleshooting Tips
- Overview of How to Access the Wireless Router
- How to Manually Configure Your Internet Connection
- Using the Smart Setup Wizard
- NETGEAR Product Registration, Support, and Documentation
- Chapter 4 Optimizing Wireless Connectivity and Security
- Chapter 5 Doing Basic Router Housekeeping
- Chapter 6 Troubleshooting Common Problems
- Appendix A Technical Specifications
- Appendix B Preparing Your Network
- What You Need To Use a Router with a Broadband Modem
- Preparing Your Computers for TCP/IP Networking
- Configuring Windows 95, 98, and Me for TCP/IP Networking
- Configuring Windows NT4, 2000 or XP for IP Networking
- Configuring the Macintosh for TCP/IP Networking
- Verifying the Readiness of Your Internet Account
- Restarting the Network
- Glossary

NETGEAR Wireless Router Setup Manual
Preparing Your Network B-5
February 2005
2.
Double-click the Network icon.
The Network window opens, which displays a list of installed components:
You must have an Ethernet adapter, the TCP/IP protocol, and Client for Microsoft Networks.
If you need to install a new adapter, follow these steps:
a. Click the Add button.
b. Select Adapter, and then click Add.
c. Select the manufacturer and model of your Ethernet adapter, and then click OK.
If you need TCP/IP:
a. Click the Add button.
b. Select Protocol, and then click Add.
Note: It is not necessary to remove any other network components shown in the
Network window in order to install the adapter, TCP/IP, or Client for Microsoft
Networks.