N150 Wireless Router WNR1000v3h2 User Manual 350 East Plumeria Drive San Jose, CA 95134 USA October 2010 202-10753-01 1.
N150 Wireless Router User Manual ©2010 NETGEAR, Inc. All rights reserved. No part of this publication may be reproduced, transmitted, transcribed, stored in a retrieval system, or translated into any language in any form or by any means without the written permission of NETGEAR, Inc. Technical Support Thank you for choosing NETGEAR. To register your product, get the latest product updates, or get support online, visit us at http://support.netgear.com.
Table of Contents Chapter 1 Configuring Basic Connectivity Using the Setup Manual . . . . . . . . . . . . . . . . . . . . . . . . . . . . . . . . . . . . . . . . 6 Logging In To Your Wireless Router . . . . . . . . . . . . . . . . . . . . . . . . . . . . . . 7 Selecting a Language for Your Screen Display . . . . . . . . . . . . . . . . . . . . . . 9 Configuring Your Internet Settings Using the Setup Wizard. . . . . . . . . . . . 11 Viewing and Configuring Basic Internet Settings . . . . . . . . . . . . .
N150 Wireless Router User Manual Chapter 4 Customizing Your Network Settings Using the LAN IP Setup Options . . . . . . . . . . . . . . . . . . . . . . . . . . . . . . . . 48 Configuring a Device Name . . . . . . . . . . . . . . . . . . . . . . . . . . . . . . . . . . 49 Configuring LAN TCP/IP Setup Parameters. . . . . . . . . . . . . . . . . . . . . . 49 Using the Router as a DHCP Server . . . . . . . . . . . . . . . . . . . . . . . . . . . 50 Using Address Reservation . . . . . . . . . . . . . . . . . .
N150 Wireless Router User Manual Chapter 7 Troubleshooting Quick Tips. . . . . . . . . . . . . . . . . . . . . . . . . . . . . . . . . . . . . . . . . . . . . . . . . . 91 Troubleshooting Basic Functions . . . . . . . . . . . . . . . . . . . . . . . . . . . . . . . .92 Login Problems. . . . . . . . . . . . . . . . . . . . . . . . . . . . . . . . . . . . . . . . . . . . . . 94 Checking the Internet Service Connection . . . . . . . . . . . . . . . . . . . . . . . . .95 Obtaining an Internet IP Address . .
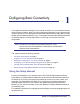
1 Configuring Basic Connectivity 1 This chapter describes the settings for your Internet connection and your wireless local area network (LAN) connection. When you perform the initial configuration of your wireless router using the Resource CD as described in the NETGEAR Wireless Router Setup Manual, these settings are specified automatically for you. This chapter provides further details about these connectivity settings, as well as instructions on how to log in to the router for further configuration.
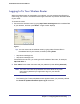
N150 Wireless Router User Manual Logging In To Your Wireless Router When the wireless router is connected to your network, you can access and configure the router using your browser. The Default Access login information is printed on the bottom label of your router. To access the router: 1. Connect to the wireless router by typing http://www.routerlogin.net in the address field of your browser, and then press Enter. A login window displays Figure 1. .
N150 Wireless Router User Manual Figure 2. This message displays if the router discovers that new firmware is available. (If no new firmware is available, the router will proceed to the router status screen.) Figure 3. - To automatically update to the new firmware, click Yes to allow the router to download and install the new firmware file from NETGEAR.
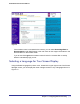
N150 Wireless Router User Manual Figure 4. If the wireless router is connected to the Internet, you can select Knowledge Base or Documentation under Web Support in the main menu to view support information or the documentation for the wireless router. If you do not click Logout, the wireless router will wait for 5 minutes after no activity before it automatically logs you out.
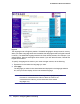
N150 Wireless Router User Manual Figure 5. The language is set to English by default. The default language is always stored in memory. When you select a language other than the default, that language as well as English is stored in memory. The additional language stored is the most recently selected. For example, if you select Deutsch, German and English will be stored. If you next select Chinese, Chinese and English will be stored.
N150 Wireless Router User Manual Configuring Your Internet Settings Using the Setup Wizard You can manually configure your Internet connection using the Basic Settings screen, or you can allow the Setup Wizard to determine your Internet Service Provider (ISP) configuration. The Setup Wizard searches your Internet connection for servers and protocols to determine your ISP configuration. To use the Setup Wizard to assist with configuration or to verify the Internet connection settings: 1.
N150 Wireless Router User Manual No login required Figure 6. • Account Name (might also be called Host Name). The account name is provided to the ISP during a DHCP request from your router. In most cases, this setting is not required, but some ISPs require it for access to ISP services such as mail or news servers. • Domain Name. The domain name is provided by your router to computers on your LAN when the computers request DHCP settings from your router. In most cases, this settings is not required.
N150 Wireless Router User Manual Note: If you enter or change a DNS address, restart the computers on your network so that these settings take effect. • Router MAC Address. This section determines the Ethernet MAC address that the router will use on the Internet port. Typically, you would leave Use Default Address selected. However, some ISPs (especially cable modem providers) register the Ethernet MAC address of the network interface card in your computer when your account is first opened.
N150 Wireless Router User Manual Login required Figure 7. • Does Your Internet Connection Require A Login? If you usually must use a login program such as WinPOET to access the Internet, your Internet connection requires a login. After you select Yes, the Basic Settings screen displays. Note: After you finish setting up your router, you will no longer need to launch the ISP’s login program on your computer to access the Internet.
N150 Wireless Router User Manual Figure 8. - PPTP (Point to Point Tunneling Protocol), used primarily in Austrian DSL services - Telstra Bigpond, an Australian residential cable modem service Note: The Telstra Bigpond setting is only for older cable modem service accounts still requiring a Bigpond login utility. Telstra has discontinued this type of account. Those with Telstra DSL accounts and newer cable modem accounts should select No for Does Your Internet Connection Require a Login.
N150 Wireless Router User Manual • Domain Name Server (DNS) Address. If you know that your ISP does not automatically transmit DNS addresses to the router during login, select Use These DNS Servers, and enter the IP address of your ISP’s primary DNS server. If a secondary DNS server address is available, enter it also. Note: If you enter or change a DNS address, restart the computers on your network so that these settings take effect.
N150 Wireless Router User Manual Note: The SSID is case-sensitive; NETGEAR is not the same as nETgear. Also, the SSID of any wireless access adapters must match the SSID you specify in the WNR1000v3h2 router. If they do not match, you will not get a wireless connection to the WNR1000v3h2 router. 4. For the remaining settings, accept the defaults. • The default channel is Auto.
N150 Wireless Router User Manual Figure 11. 7. Make sure that the Enable Wireless Router Radio, Enable SSID Broadcast, and Enable WMM check boxes are selected. 8. Click Setup Access List. 9. Make sure that the Turn Access Control On check box is not selected. 10. Configure and test your wireless computer for wireless connectivity. Program the wireless adapter of your computer to have the same SSID and channel that you specified in the router, and disable encryption.
2 Safeguarding Your Network 2 The N150 Wireless Router provides highly effective security features, which are covered in detail in this chapter.
N150 Wireless Router User Manual Choosing Appropriate Wireless Security Unlike wired networks, wireless networks allow anyone with a compatible adapter to receive your wireless data transmissions well beyond your walls. Operating an unsecured wireless network creates an opportunity for outsiders to eavesdrop on your network traffic or to enter your network to access your computers and files. Indoors, computers can connect over wireless networks at ranges of up to 300 feet.
N150 Wireless Router User Manual Wireless data security options Range: up to 300 foot radius 1) Open system: easy but no security WNR1000v3h2 2) MAC access list: no data security Note: Use these with other features that enhance security (Table 2). Figure 1. To configure the wireless network, you can: • • Manually specify your SSID and your wireless security settings. The WNR1000v3h2 router provides two screens for configuring the wireless settings: - Wireless Settings.
N150 Wireless Router User Manual security methods, click the link to the online document Wireless Networking Basics in Appendix B. Table 1. Wireless Security Options Security Type Description None. No wireless security. Recommended only for troubleshooting wireless connectivity. Do not run an unsecured wireless network unless it is your intention to provide free Internet access for the public. WEP. Wired Equivalent Privacy.
N150 Wireless Router User Manual Table 2. Other Features That Enhance Security Security Type Description Restrict access based on MAC address. You can restrict access to only trusted computers so that unknown computers cannot wirelessly connect to the WNR1000v3h2 router. MAC address filtering adds an obstacle against unwanted access to your network by the general public, but the data broadcast over the wireless link is fully exposed.
N150 Wireless Router User Manual - WEP Encryption Key Size. Choose one: 64-bit or 128-bit. Again, the encryption key size must be the same for the wireless adapters and the wireless router. - Data Encryption (WEP) Keys. There are two methods for creating WEP data encryption keys. Whichever method you use, record the key values in the spaces provided. • Passphrase Method. ______________________________ These characters are case-sensitive. Enter a word or group of printable characters and click Generate.
N150 Wireless Router User Manual Figure 2. The available settings in this screen are: • Name (SSID). The SSID is also known as the wireless network name. Enter a value of up to 32 alphanumeric characters. When more than one wireless network is active, different wireless network names provide a way to separate the traffic. For a wireless device to participate in a particular wireless network, it must be configured with the SSID for that network. The WNR1000v3h2 default SSID is NETGEAR.
N150 Wireless Router User Manual Note: The maximum wireless signal rate is derived from the IEEE Standard 802.11 specifications. Actual data throughput will vary. Network conditions and environmental factors, including volume of network traffic, building materials and construction, and network overhead, lower actual data throughput rate. The Mode options are: • - Up to 54 Mbps - Legacy Mode with maximum speed of up to 54 Mbps for b/g networks.
N150 Wireless Router User Manual authentication. Anyone can join the network. This setting provides very little practical wireless security. • Shared Key. With Shared Key authentication, a wireless device must know the WEP key to join the network. Select the encryption strength (64 or 128 bit data encryption). Manually enter the key values, or enter a word or group of printable characters in the Passphrase field. Manually entered keys are not case-sensitive, but passphrase characters are case-sensitive.
N150 Wireless Router User Manual 5. Click Apply to save your settings. Configuring WPA-PSK and WPA2-PSK Wireless Security Wi-Fi Protected Access with Pre-Shared Key (WPA-PSK and WPA2-PSK) data encryption provides extremely strong data security, very effectively blocking eavesdropping. Because WPA and WPA2 are relatively new standards, older wireless adapters and devices might not support them. Check whether newer drivers are available from the manufacturer.
N150 Wireless Router User Manual Figure 4. 4. Click Apply to save your settings. Viewing Advanced Wireless Settings This section describes the wireless settings that you can view and specify in the Advanced Wireless Settings screen, which you access under Advanced in the main menu. To configure the advanced wireless security settings of your router: 1. Log in to the router as described in Logging In To Your Wireless Router on page 7. 2. Select Wireless Settings under Advanced in the main menu.
N150 Wireless Router User Manual • Enable Wireless Router Radio. If you disable the wireless router radio, wireless devices cannot connect to the WNR1000v3h2 router. If you will not be using your wireless network for a period of time, you can clear this check box and disable all wireless connectivity. • Enable SSID Broadcast. Clear this check box to disable broadcast of the SSID, so that only devices that know the correct SSID can connect.
N150 Wireless Router User Manual Note: If you choose to use WPS, the only security methods supported are WPA-PSK and WPA2-PSK. WEP security is not supported by WPS.
N150 Wireless Router User Manual Figure 6. 4. Click the button in the Add WPS Client screen. The Connecting to New Wireless Client screen displays. Figure 7. The green light on the WNR1000v3h2 router begins to blink in a regular pattern. While the button light is blinking, you have 2 minutes to enable WPS on the device you are trying to connect to the router. 5. In the wireless client, follow its specific networking instructions to enable WPS, to allow it to connect to the router.
N150 Wireless Router User Manual 2. On the wireless client, follow its specific networking instructions to enter the router’s security PIN and to establish a wireless connection with the router. Using the Wireless Client’s Security PIN 1. Log in to the router as described in Logging In To Your Wireless Router on page 7. 2. Select Add WPS Client in the main menu, and click Next. 3. Select the PIN Number setup method. Figure 8. 4.
N150 Wireless Router User Manual Figure 10. These options are available under WPS Settings: • Router’s PIN. The PIN is displayed so that you can use it to configure the router through WPS (Wi-Fi Protected Setup) without using the Push Button or entering the client’s PIN from the router management GUI. It is also displayed on the router’s label. • Disable Router’s PIN. If the router’s PIN is disabled, you cannot run WPS through the router’s PIN method.methods still work,.
N150 Wireless Router User Manual 1. Follow the procedures in Push Button Configuration on page 31 or Security PIN Entry on page 32. 2. For information about how to view a list of all devices connected to your router (including wireless and Ethernet-connected), see Viewing a List of Attached Devices on page 82.
N150 Wireless Router User Manual 1. Select Wireless Settings under Advanced in the main menu. 2. In the Advanced Wireless Settings screen, click Setup Access List to display the Wireless Card Access List. Figure 11. 3. Click Add to add a wireless device to the wireless access control list. The Wireless Card Access Setup screen opens and displays a list of currently active wireless cards and their MAC addresses. Figure 12. 4.
N150 Wireless Router User Manual Note: When configuring the router from a wireless computer whose MAC address is not in the Trusted PC list, if you select Turn Access Control On, you lose your wireless connection when you click Apply. You must then access the wireless router from a wired computer or from a wireless computer that is on the access control list to make any further changes.. 8. Click Apply to save your Wireless Card Access List settings.
N150 Wireless Router User Manual Figure 13. 2. Select any of the following Wireless settings: - Enable Guest Network – When this check box is selected, the guest network is enabled, and guests can connect to your network using the SSID of this profile. - Enable SSID Broadcast – If selected, the Wireless Access Point broadcasts its name (SSID) to all Wireless Stations. Stations can adopt the correct SSID for connections to this Access Point.
N150 Wireless Router User Manual Tip: Before changing the router password, back up your configuration settings with the default password of password. If you save the settings with a new password, and then you later forget the new password, you will have to reset the router back to the factory defaults, and log in using the default password of password. This means you will have to re-enter all the router configuration settings.
N150 Wireless Router User Manual Tip: Before saving your configuration file, change the administrator password to the default, password. Then change it again after you have saved the configuration file. If you save the file with a new password, and then you later forget the new password, you will have to reset the router back to the factory defaults and log in using the default password of password. This means you will have to re-enter all the router configuration settings.
3 Restricting Access From Your Network 3 This chapter describes how to use the content filtering and reporting features of the N150 Wireless Router to protect your network.
N150 Wireless Router User Manual 1. Select Block Sites under Content Filtering in the main menu. The Block Sites screen displays. Figure 1. 2. Enable keyword blocking by selecting either Per Schedule or Always. To block by schedule, be sure to specify a time period in the Schedule screen. For information about scheduling, see Scheduling Blocking on page 44. Block all access to Internet browsing during a scheduled period by entering a dot (.) as the keyword, and then set a schedule in the Schedule screen.
N150 Wireless Router User Manual Web servers serve Web pages, time servers serve time and date information, and game hosts serve data about other players’ moves. When a computer on your network sends a request for service to a server computer on the Internet, the requested service is identified by a service or port number. This number appears as the destination port number in the transmitted IP packets. For example, a packet that is sent with destination port number 80 is an HTTP (Web server) request.
N150 Wireless Router User Manual To define a service, first you must determine which port number or range of numbers is used by the application. The service port numbers for many common protocols are defined by the Internet Engineering Task Force (IETF) and published in RFC1700, “Assigned Numbers.” Service numbers for other applications are typically chosen from the range 1024 to 65535 by the authors of the application.
N150 Wireless Router User Manual 2. Configure the schedule for blocking keywords and services. a. Days to Block. Select days on which you want to apply blocking by selecting the appropriate check boxes. Select Every Day to select the check boxes for all days. Click Apply. b. Time of Day to Block. Select a start and end time in 24-hour format. Select All Day for 24-hour blocking. Click Apply. Be sure to select your time zone in the E-mail screen as described in Setting the Time Zone on page 47. 3.
N150 Wireless Router User Manual Table 1. Log Entry Descriptions Field Description Target address The name or IP address of the website or newsgroup visited or to which access was attempted. Action Whether the access was blocked or allowed. To refresh the log screen, click the Refresh button. To clear the log entries, click the Clear Log button. To e-mail the log immediately, click the Send Log button.
N150 Wireless Router User Manual b. Enter the e-mail address to which logs and alerts are sent in the Send To This E-mail Address field. This e-mail address will also be used as the From address. If you leave this field blank, log and alert messages will not be sent by e-mail. 3. If your e-mail server requires authentication, select the My Mail Server requires authentication check box. a. Enter your user name for the e-mail server in the User Name field. b.
4 Customizing Your Network Settings 4 This chapter describes how to configure advanced networking features of the N150 Wireless Router, including LAN, WAN, and routing settings.
N150 Wireless Router User Manual Configuring a Device Name The device name is a user-friendly name for the router. This name is shown in the Network on Windows Vista and the Network Explorer on all Windows systems. The Device Name field cannot be blank. The default name is WNR1000v3h2. Configuring LAN TCP/IP Setup Parameters These are advanced settings that you might configure if you are a network administrator and your network contains multiple routers.
N150 Wireless Router User Manual - RIP-2M carries more information than RIP-1 and uses multicasting. Using the Router as a DHCP Server By default, the router functions as a DHCP server, allowing it to assign IP, DNS server, and default gateway addresses to all computers connected to the router’s LAN. The assigned default gateway address is the LAN address of the router. The router assigns IP addresses to the attached computers from a pool of addresses specified in this screen.
N150 Wireless Router User Manual Figure 2. To reserve an IP address: 1. Click Add. 2. In the IP Address field, enter the IP address to assign to the computer or server. (Choose an IP address from the router’s LAN subnet, such as 192.168.1.x.) 3. Enter the MAC address of the computer or server. Tip: If the computer is already present on your network, you can copy its MAC address from the Attached Devices screen and paste it here. 4. Click Apply to enter the reserved address into the table.
N150 Wireless Router User Manual Your router contains a client that can connect to the Dynamic DNS service provided by DynDNS.org. You must first visit their website at www.dyndns.org and obtain an account and host name, which you specify in the router. Then, whenever your ISP-assigned IP address changes, your router automatically contacts the Dynamic DNS service provider, logs in to your account, and registers your new IP address.
N150 Wireless Router User Manual Figure 4. Disabling Port Scan and DoS Protection The DoS firewall protects your network and computers against attacks and intrusions. A stateful packet firewall carefully inspects incoming traffic packets, looking for known exploits such as malformed, oversized, or out-of-sequence packets. The firewall should be disabled only in special circumstances, such as when you are troubleshooting application issues.
N150 Wireless Router User Manual To assign a computer or server to be a default DMZ server: 1. Select the Default DMZ Server check box. 2. In the Default DMZ Server fields, enter the IP address for that computer or server. 3. Click Apply. Responding to a Ping on the Internet (WAN) Port If you want the router to respond to a ping from the Internet, select the Respond to Ping on Internet Port check box.
N150 Wireless Router User Manual configure static routes only for unusual cases such as multiple routers or multiple IP subnets located on your network. As an example of when a static route is needed, consider the following case: • Your primary Internet access is through a cable modem to an ISP. • You have an ISDN router on your home network for connecting to the company where you are employed. This router’s address on your LAN is 192.168.1.100. • Your company’s network address is 134.177.0.0.
N150 Wireless Router User Manual Figure 6. 3. In the Route Name field, enter a name for this static route. (This is for identification purposes only.) 4. Select the Private check box if you want to limit access to the LAN only. If Private is selected, the static route is not reported in RIP. 5. Select the Active check box to make this route effective. 6. In the Destination IP Address field, enter the IP address of the final destination. 7.
5 5 Fine-Tuning Your Network This chapter describes how to modify the configuration of the N150 Wireless Router to allow specific applications to access the Internet or to be accessed from the Internet, and how to make adjustments to enhance your network’s performance.
N150 Wireless Router User Manual How Your Computer Accesses a Remote Computer through Your Router When a computer on your network needs to access a computer on the Internet, your computer sends your router a message containing source and destination address and process information. Before forwarding your message to the remote computer, your router must modify the source information and must create and track the communication session so that replies can be routed back to your computer.
N150 Wireless Router User Manual The Web server then sends this reply message to your router. 5. Upon receiving the incoming message, your router checks its session table to determine whether there is an active session for port number 33333. Finding an active session, the router then modifies the message, restoring the original address information replaced by NAT. The message now contains the following address and port information: • The source address is the IP address of www.example.com.
N150 Wireless Router User Manual 5. The IRC server sends a return message to your router using the NAT-assigned source port (as in the previous example, let’s say port 33333) as the destination port. The IRC server also sends an “identify” message to your router with destination port 113. 6. Upon receiving the incoming message to destination port 33333, your router checks its session table to determine whether there is an active session for port number 33333.
N150 Wireless Router User Manual The remote computer then sends this request message through the Internet to your router. 2. Your router receives the request message and looks in its rules table for any rules covering the disposition of incoming port 80 traffic. Your port forwarding rule specifies that incoming port 80 traffic should be forwarded to local IP address 192.168.1.123.
N150 Wireless Router User Manual Before starting, you need to determine which type of service, application, or game you will provide, and the local IP address of the computer that will provide the service. Be sure the computer’s IP address never changes. Tip: To ensure that your server computer always has the same IP address, use the reserved IP address feature of your WNR1000v3h2 router. See Using Address Reservation on page 50 for instructions on how to use reserved IP addresses.
N150 Wireless Router User Manual Figure 2. 3. In the Service Name field, enter a descriptive name. 4. In the Service Type field, select the protocol. If you are unsure, select TCP/UDP. 5. In the Starting Port field, enter the beginning port number. • If the application uses only a single port, enter the same port number in the Ending Port field. • If the application uses a range of ports, enter the ending port number of the range in the Ending Port field. 6.
N150 Wireless Router User Manual 1. Assign your Web server either a fixed IP address or a dynamic IP address using DHCP address reservation, as explained in Using Address Reservation on page 50. In this example, your router will always give your Web server an IP address of 192.168.1.33. 2. In the Port Forwarding screen, configure the router to forward the HTTP service to the local address of your Web server at 192.168.1.33. HTTP (port 80) is the standard protocol for Web servers. 3.
N150 Wireless Router User Manual Figure 4. 3. Clear the Disable Port Triggering check box. Note: If the Disable Port Triggering check box is selected after you configure port triggering, port triggering is disabled. However, any port triggering configuration information you added to the router is retained even though it is not used. 4. In the Port Triggering Timeout field, enter a value up to 9999 minutes. This value controls the inactivity timer for the designated inbound ports.
N150 Wireless Router User Manual 6. the Port Triggering–Services screen displays. 7. In the Service Name field, enter a descriptive service name. 8. In the Service User field, select Any (the default) to allow this service to be used by any computer on the Internet. Otherwise, select Single address, and enter the IP address of one computer to restrict the service to a particular computer. 9. Select the service type, either TCP or UDP. 10.
N150 Wireless Router User Manual Figure 7. 2. The available settings and information displayed in this screen are: • Turn UPnP On. UPnP can be enabled or disabled for automatic device configuration. The default setting for UPnP is disabled. If this check box is not selected, the router does not allow any device to automatically control the resources, such as port forwarding (mapping) of the router. • Advertisement Period. The advertisement period is how often the router broadcasts its UPnP information.
N150 Wireless Router User Manual Note: Failure to follow these guidelines can result in significant performance degradation or inability to wirelessly connect to the router. For complete range and performance specifications, click the link to the online document Wireless Networking Basics in Appendix B. The following list describes how to optimize wireless router performance. • Identify critical wireless links.
N150 Wireless Router User Manual Using WMM for Wireless Multimedia Applications The WNR1000v3h2 router supports Wi-Fi Multimedia (WMM) to prioritize wireless voice and video traffic over the wireless link. WMM provides prioritization of wireless data packets from different applications based on four access categories: voice, video, best effort, and background. For an application to receive the benefits of WMM, both it and the client running that application must be WMM enabled.
N150 Wireless Router User Manual Configuring QoS for Internet Access You can give prioritized Internet access to the following types of traffic: • For specific applications • For specific online games • On individual Ethernet LAN ports of the router • From a specific device by MAC address To specify prioritization of traffic, you must create a policy for the type of traffic and add the policy to the QoS Policy table in the QoS Setup screen.
N150 Wireless Router User Manual 3. In the QOS Priority Rule List, select an existing item, or you can scroll to the bottom of the list and select Add Priority Rule. a. If you chose to add a new entry, the screen expands as shown: Figure 10. b. In the QoS Policy for field, enter a descriptive name for the new application or game. c. Select the packet type, either TCP, UDP, or both (TCP/UDP), and specify the port number or range of port numbers used by the application or game. 4.
N150 Wireless Router User Manual Figure 11. 4. From the LAN port list, select the LAN port that will have a QoS policy. 5. From the Priority drop-down list, select the priority that this port’s traffic should receive relative to other applications and traffic when accessing the Internet. The options are Low, Normal, High, and Highest. 6. Click Apply to save this rule to the QoS Policy list and return to the QoS Setup screen. 7. Click Apply.
N150 Wireless Router User Manual 5. From the Priority drop-down list, select the priority that this device’s traffic should receive relative to other applications and traffic when accessing the Internet. The options are Low, Normal, High, and Highest. 6. Click Apply to save this rule to the QoS Policy list and return to the QoS Setup screen. 7. Click Apply. Editing or Deleting an Existing QoS Policy To edit or delete an existing QoS policy: 1. From the main menu, under Advanced, select QoS Setup.
N150 Wireless Router User Manual Note: An incorrect MTU setting can cause Internet communication problems such as the inability to access certain Web sites, frames within Web sites, secure login pages, or FTP or POP servers. If you suspect an MTU problem, a common solution is to change the MTU size to 1400. If you are willing to experiment, you can gradually reduce the MTU size from the maximum value of 1500 until the problem goes away. Table 1 describes common MTU sizes and applications. Table 1.
N150 Wireless Router User Manual technologies such as ADSL2+ and Fiber to the Home (FTTH) will increase the connection speed to tens of Mbps. • Wireless. Your N150 Wireless Router provides a wireless data throughput of up to 150 Mbps. With the introduction of the newer WPA and WPA2 encryption and authentication protocols, wireless security is extremely strong. To get the best performance, use RangeMax NEXT adapters such as the WN511B for your computers.
N150 Wireless Router User Manual • Backing up computers over the network has become popular due to the availability of inexpensive mass storage. Table 2 shows the time to transfer 1 gigabyte (1 GB) of data using various networking technologies. Table 2. Theoretical Transfer Time for 1 Gigabyte Network Connection Theoretical Raw Transfer Time Gigabit wired Ethernet 8 seconds RangeMax NEXT Wireless-N 26 seconds Powerline HD 40 seconds 100 Mbps wired Ethernet 80 seconds 802.
6 Using Network Monitoring Tools 6 This chapter describes how to use the maintenance features of your N150 Wireless Router.
N150 Wireless Router User Manual Viewing Wireless Router Status Information To view router status and usage information: 1. Select Router Status under Maintenance in the main menu. The Router Status screen displays. Figure 1. Table 1 describes the router status fields. Table 1. Wireless Router Status Fields Field Description Hardware Version The hardware version of the router. Firmware Version The version of the current software installed in the router. This will change if you update your router.
N150 Wireless Router User Manual Table 1. Wireless Router Status Fields (Continued) Field Description MAC Address The Media Access Control address. This is the unique physical address being used by the Internet (WAN) port of the router. IP Address The IP address being used by the Internet (WAN) port of the router. If no address is shown, or is 0.0.0.0, the router cannot connect to the Internet. DHCP If set to None, the router is configured to use a fixed IP address on the WAN.
N150 Wireless Router User Manual Table 1. Wireless Router Status Fields (Continued) Field Description Wireless Port. The following settings apply to the wireless port of the router. Name (SSID) The wireless network name (SSID) being used by the wireless port of the router. The default is NETGEAR. Region The geographic region where the router is being used. It might be illegal to use the wireless features of the router in some parts of the world.
N150 Wireless Router User Manual Table 2 describes the connection status settings. Table 2. Connection Status Settings Item Description IP Address The IP address that is assigned to the router. Subnet Mask The subnet mask that is assigned to the router. Default Gateway The IP address for the default gateway that the router communicates with.
N150 Wireless Router User Manual Table 3. Router Statistics Item Description Status The link status of the port. TxPkts The number of packets transmitted on this port since reset. RxPkts The number of packets received on this port since reset. Collisions The number of collisions on this port since reset. Tx B/s The current transmission (outbound) bandwidth used on the WAN and LAN ports (the average bytes per second transmitted since reset).
N150 Wireless Router User Manual Managing the Configuration File The configuration settings of the WNR1000v3h2 router are stored within the router in a configuration file. You can back up this file to your computer, restore it, or reset it to the factory default settings. Select Backup Settings under Maintenance in the main menu to display the Backup Settings. Figure 5. The following sections describe the three available options.
N150 Wireless Router User Manual Erasing the Configuration Under some circumstances (for example, if you move the router to a different network or if you have forgotten the password) you might want to erase the configuration and restore the factory default settings. After an erase, the router’s username is admin, the password is password, the LAN IP address is 192.168.1.1 (or www.routerlogin.net), and the router’s DHCP server is enabled.
N150 Wireless Router User Manual Figure 6. 2. Check for new software versions by clicking the Check button. • If a new version is found, information about it appears. Figure 7. • If no new firmware version is available, a message displays and the router returns to the Firmware Update screen. Figure 8. 3.
N150 Wireless Router User Manual Updating Manually to New Router Firmware To manually select, download, and install new software to your router: 1. Log in to your router, select Router Status under Maintenance on the main menu, and make note of the firmware version of your router. Figure 9. 2. Go to the WNR1000v3h2 support page on the NETGEAR website at http://www.netgear.com/support. 3. Compare the version number of the most recent firmware offered to the firmware version of your router.
N150 Wireless Router User Manual Enabling Remote Management Access Using the Remote Management feature, you can allow a user on the Internet to configure, upgrade, and check the status of your WNR1000v3h2 router. Select Remote Management under Advanced in the main menu. Figure 10. The Remote Management screen displays. Note: Be sure to change the router’s default configuration password to a very secure password.
N150 Wireless Router User Manual • To allow access from any IP address on the Internet, select Everyone. • To allow access from a range of IP addresses on the Internet, select IP Address Range. Enter a beginning and ending IP address to define the allowed range. • To allow access from a single IP address on the Internet, select Only This Computer. Enter the IP address that will be allowed access. 3. Specify the port number for accessing the management interface.
N150 Wireless Router User Manual Traffic Meter Traffic Metering allows you to monitor the volume of Internet traffic passing through your router’s Internet port. With the Traffic Meter utility, you can set limits for traffic volume, set a monthly limit, and get a live update of traffic usage. To monitor traffic on your router, do the following: 1. On the Advanced menu, click Traffic Meter. Figure 11. 2. To enable the Traffic Meter, click the Enable Traffic Meter check box.
N150 Wireless Router User Manual 3. If you would like to record and restrict the volume of Internet traffic, click the Traffic volume control by radio button. You can select one of the following options for controlling the traffic volume: • No Limit – No restriction is applied when the traffic limit is reached. • Download only – The restriction is applied to incoming traffic only. • Both Directions – The restriction is applied to both incoming and outgoing traffic. 4.
7 7 Troubleshooting This chapter provides information about troubleshooting your N150 Wireless Router. After each problem description, instructions are provided to help you diagnose and solve the problem. As a first step, please review the Quick Tips. Tip: NETGEAR provides helpful articles, documentation, and the latest software updates at http://www.netgear.com/support.
N150 Wireless Router User Manual Make sure that the Ethernet cables are securely plugged in. • The Internet status light on the wireless router is on if the Ethernet cable connecting the wireless router and the modem is plugged in securely and the modem and wireless router are turned on. • For each powered-on computer connected to the wireless router by an Ethernet cable, the corresponding numbered router LAN port light is on.
N150 Wireless Router User Manual 4. If you have enabled WPS security, verify that the push-button stops blinking and changes to green (otherwise the push-button light should be off). If the correct behavior does not occur, see the appropriate following section. The Power light is not on. If the Power and other lights are off when your router is turned on: • Make sure that the power cord is properly connected to your router and that the power adapter is properly connected to a functioning power outlet.
N150 Wireless Router User Manual 1. The Internet is not accessible. Confirm that you have the correct internet setting. 2. Clear the router’s configuration to factory defaults. This will set the router’s IP address to www.routerlogin.net. This procedure is explained in Restoring the Default Configuration and Password on page 100. 3. Turn the power off and back on, and re-configure the router, to see if the router recovers. The Internet or LAN port lights are not on.
N150 Wireless Router User Manual Note: If your computer cannot reach a DHCP server, some operating systems will assign an IP address in the range 169.254.x.x. If your IP address is in this range, verify that you have a good connection from the computer to the router, then restart (reboot) your computer. • If your router’s IP address has been changed and you don’t know the current IP address, see http://www.routerlogin.net. • Make sure your browser has Java, JavaScript, or ActiveX enabled.
N150 Wireless Router User Manual • You might need to force your cable or DSL modem to recognize your new router by restarting your network, in the sequence described in the NETGEAR Wireless Router Setup Manual. • Your service provider might require a login. Ask your service provider whether they require a PPP over Ethernet (PPPoE) login (see Troubleshooting PPPoE on page 96). • You might have incorrectly set the service name, user name or password. Review your router’s Basic Settings screen.
N150 Wireless Router User Manual • Your computer might not recognize any DNS server addresses. A DNS server is a host on the Internet that translates Internet names (such as www addresses) to numeric IP addresses. Typically, your ISP will provide the addresses of one or two DNS servers for your use. If you entered a DNS address during the wireless router’s configuration, restart your computer.
N150 Wireless Router User Manual If the path is working, you see this message: Reply from < IP address >: bytes=32 time=NN ms TTL=xxx If the path is not working, you see this message: Request timed out If the path is not functioning correctly, you could have one of the following problems: • • Wrong physical connections - For a wired connection, make sure that the numbered LAN port light is on for the port to which you are connected.
N150 Wireless Router User Manual • Your ISP could be rejecting the Ethernet MAC addresses of all but one of your computers. Many broadband ISPs restrict access by allowing traffic only from the MAC address of your broadband modem, but some ISPs additionally restrict access to the MAC address of a single computer connected to that modem. If this is the case, you must configure your router to “clone” or “spoof” the MAC address from the authorized computer.
N150 Wireless Router User Manual • Is your router’s wireless radio enabled? See Viewing Advanced Wireless Settings on page 29. • Is your router’s SSID broadcast enabled? See Viewing Advanced Wireless Settings on page 29. • Is your router set to a wireless standard that is not supported by your wireless adapter? Check the Mode setting as described in Viewing and Configuring Basic Internet Settings on page 11.
A A Technical Specifications Default Configuration Settings This appendix provides factory default settings and technical specifications for the N150 Wireless Router. Table 1. WNR1000v3h2 Router Default Configuration Settings Feature Default Setting Router Login Router Login URL http://www.routerlogin.net or http://www.routerlogin.
N150 Wireless Router User Manual Table 1.
N150 Wireless Router User Manual General Specifications Table 2. WNR1000v3h2 Router General Specifications Feature General Network Protocol and Standards Compatibility Data and Routing Protocols TCP/IP, RIP-1, RIP-2, DHCP, PPPoE, PPTP, Bigpond, Dynamic DNS, and UPnP Power Adapter North America 120V, 60 Hz, input UK, Australia 240V, 50 Hz, input Europe 230V, 50 Hz, input Japan 100V, 50/60 Hz, input All regions (output) 12V DC @ 1.0A, output Physical Dimensions 28 x 175 x 119 mm (1.1 x 6.
B B Related Documents This appendix provides links to reference documents you can use to gain a more complete understanding of the technologies used in your NETGEAR product. Table 1. Reference Documents Document Link TCP/IP Networking Basics http://documentation.netgear.com/reference/enu/tcpip/index.htm Wireless Networking Basics http://documentation.netgear.com/reference/enu/wireless/index.htm Preparing Your Network http://documentation.netgear.com/reference/enu/wsdhcp/index.
C Notification of Compliance NETGEAR Wireless Routers, Gateways, AP’s C Regulatory Compliance Information This section includes user requirements for operating this product in accordance with National laws for usage of radio spectrum and operation of radio devices. Failure of the end-user to comply with the applicable requirements may result in unlawful operation and adverse action against the end-user by the applicable National regulatory authority.
N150 Wireless Router User Manual FCC Caution • Any changes or modifications not expressly approved by the party responsible for compliance could void the user’s authority to operate this equipment. • This device complies with Part 15 of the FCC Rules. Operation is subject to the following two conditions: (1) This device may not cause harmful interference, and (2) this device must accept any interference received, including interference that may cause undesired operation.
N150 Wireless Router User Manual Table 2. EDOC in Languages of the European Community Language Statement English Hereby, NETGEAR Inc., declares that this Radiolan is in compliance with the essential requirements and other relevant provisions of Directive 1999/5/EC. Español [Spanish] Por medio de la presente NETGEAR Inc. declara que el Radiolan cumple con los requisitos esenciales y cualesquiera otras disposiciones aplicables o exigibles de la Directiva 1999/5/CE.
N150 Wireless Router User Manual Table 2. EDOC in Languages of the European Community Language Statement Suomi [Finnish] NETGEAR Inc. vakuuttaa täten että Radiolan tyyppinen laite on direktiivin 1999/5/EY oleellisten vaatimusten ja sitä koskevien direktiivin muiden ehtojen mukainen. Svenska [Swedish] Härmed intygar NETGEAR Inc. att denna Radiolan står I överensstämmelse med de väsentliga egenskapskrav och övriga relevanta bestämmelser som framgår av direktiv 1999/5/EG.
Index A access blocking 41 remote 87 restricting by MAC address 35 to a remote computer 58 to the router 7 viewing logs 45 access control turning off 18 turning on 36 account name 12 adding custom service 62 priority rules 70 reserved IP addresses 50 static routes 55 wireless clients 30, 34, 80 See also configuring administrator password, changing 38 advanced wireless settings 29 advertisement period 67 AES (Advanced Encryption Standard) encryption 28 applications, QoS for 70 attached devices 82 authenticat
N150 Wireless Router User Manual disabling router PIN 34 DMZ server 53 DNS servers 58 Documentation Web page 9 documents, reference 104 domain name 12 Domain Name Server (DNS) addresses current 79 entering 12, 16 Dynamic DNS 51 dynamic IP addresses 12 DynDNS.
N150 Wireless Router User Manual logs sending 46 time-stamping entries 47 viewing 45 M MAC addresses attached devices 82 current 79 entering 13 QoS for 72 restricting access by 35 spoofing 96 mail server, outgoing 46 managing router remotely 87 metric value 56 mixed mode encryption 22, 28 mode, communication 25, 80 MTU size 54, 73 N NAT (Network Address Translation) 53, 54, 58 NetBIOS host name 82 Network Time Protocol (NTP) 47, 99 O obstructions, connecting through 75 online games, QoS for 70 Open Syst
N150 Wireless Router User Manual S scheduling blocking 44 screen display language 9 selecting 9 secondary DNS server 12, 16 security options, compared 20 setting up 20 security PIN 32, 34 service name 15 service numbers 44 services, blocking 42 setting time 47 settings, default.