
User manual

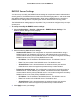
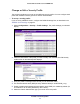
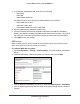

Table Of Contents
- ProSafe Wireless-N Access Point WNAP210
- Contents
- 1. Getting Started
- 2. Installation and Configuration
- Wireless Equipment Placement and Range Guidelines
- Prepare to Install the Access Point
- Connect to the Access Point
- Log In to the Access Point
- Configure LAN Settings
- Set Basic IP Options
- Set Up and Test Basic Wireless Connectivity
- QoS Settings
- Deploy the Access Point
- Wireless Security Options
- Security Profiles
- Restrict Wireless Access by MAC Address
- 3. Management
- 4. Monitoring
- 5. Advanced Configuration
- 6. Troubleshooting and Debugging
- A. Supplemental Information
- B. Command Line Reference
- C. Notification of Compliance
- Index

Installation and Configuration
21
ProSafe Wireless-N Access Point WNAP210
Security Profiles
Security profiles let you set up unique security settings for each SSID. You can configure up
to eight unique 802.11b/g/n wireless security profiles on the access point. Select
Configuration > Security > Profile Settings to display the Profile Settings screen:
If you are using a RADIUS server, configure the RADIUS settings first, as described in the
RADIUS Server Settings on page 24.
An overview of the information that is required to set up a security profile follows—including a
description of the network authentication choices that are available.
Profile Definition
Only the first profile is enabled by default. The rest of the profiles are disabled and need to be
enabled if configured.
Specify the following settings:
• Profile Name. Use a name that makes it easy to recognize the profile and to tell profiles
apart. (The default names are NETGEAR_11ng, NETGEAR-1_11ng, NETGEAR-2_11ng,
and so on.) You can enter a value of up to 32 alphanumeric characters.
• SSID. This is the name of your wireless network. It is set to the default name of
NETGEAR_11ng for 802.11b/g/n.
• Security. The wireless security used for this SSID.
• VLAN. You can use the default VLAN 1, or you can set up VLANs for your profiles. See
802.1Q VLAN on page 47.
• Enable. Select the Enable check box to enable the profile.