
Quick Reference Guide


Table Of Contents
- ProSafe Wireless-N Access Point WNAP210 Reference Manual
- Contents
- Chapter 1 Introduction
- Chapter 2 Installation and Configuration
- Wireless Equipment Placement and Range Guidelines
- Understanding WNAP210 Wireless Security Options
- Installing the WNAP210 Wireless Access Point
- Deploying the Access Point
- Mounting the Access Point Using the Wall Mount Kit (Optional)
- Setting Basic IP Options
- Wireless Settings
- Setting Up and Testing Basic Wireless Connectivity
- Understanding Security Profiles
- Chapter 3 Management
- Remote Management
- Remote Console
- Upgrading the Wireless Access Point Software
- Managing the Configuration File
- Restoring the WNAP210 to the Factory Default Settings
- Changing the Administrator Password
- Enabling the Syslog Server
- Using Activity Log Information
- Viewing General Summary Information
- Viewing Network Traffic Statistics
- Viewing Available Wireless Station Statistics
- Enabling Rogue AP Detection
- Viewing and Saving AP Lists
- Chapter 4 Advanced Configuration
- Chapter 5 Troubleshooting and Debugging
- No lights are lit on the wireless access point.
- The Wireless LAN LED does not light up.
- The Ethernet LAN LED is not lit.
- I cannot access the Internet or the LAN with a wireless- capable computer.
- I cannot connect to the WNAP210 to configure it.
- When I enter a URL or IP address, I get a time-out error.
- Using the Restore Factory Settings Button to Restore Default Settings
- Appendix A Default Settings and Technical Specifications
- Appendix B Related Documents
- Appendix C Command Line Reference
- Index
ProSafe Wireless-N Access Point WNAP210 Reference Manual
2-32 Installation and Configuration
v1.0 March 2009
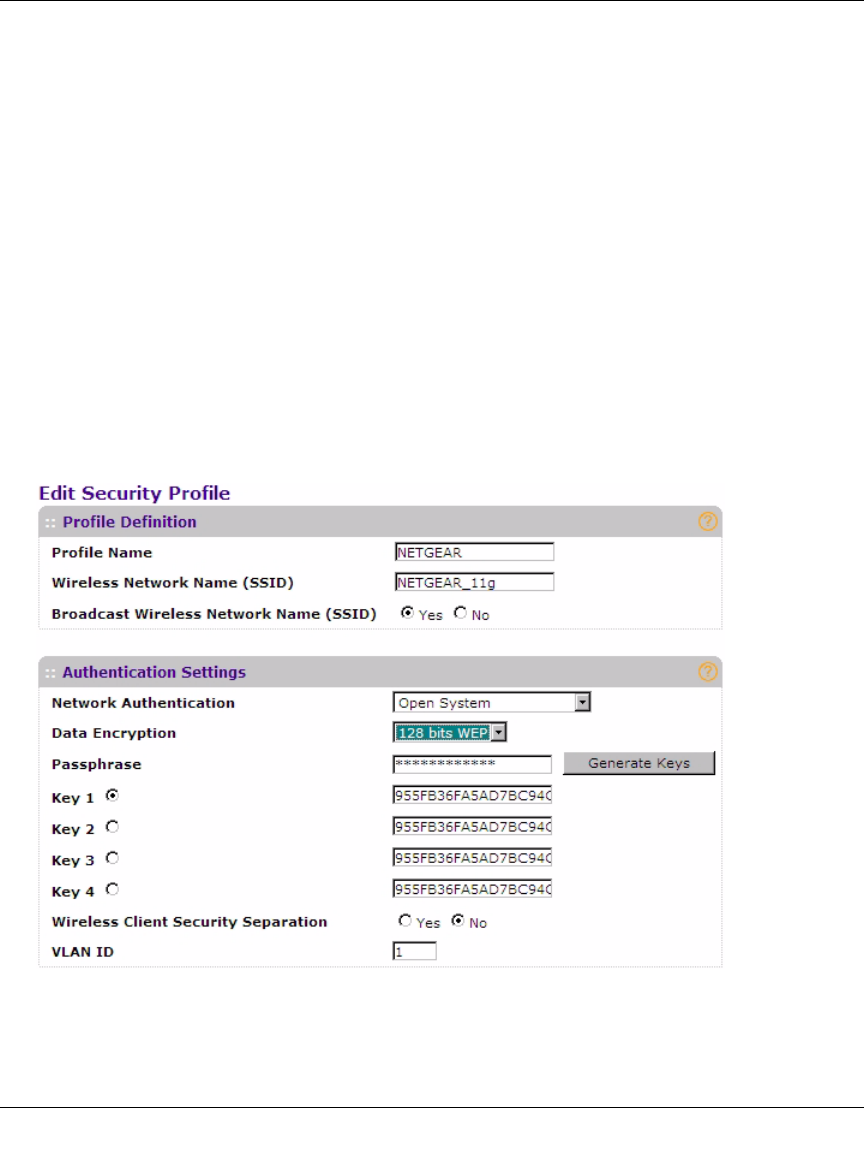
Configuring WEP
To configure WEP data encryption:
1. From the Network Authentication drop-down list, select
either Open System or Shared
Key.
2. From the Data Encryption
drop-down list, select encryption strength (64 bits, 128 bits, or 152
bits).
3. Y
ou manually or automatically program the four data encryption keys. These values must be
identical on all PCs and wireless access points in your network. Choose either:
Figure 2-16
• Automatic. Enter a word or group of printable characters in the Passphrase box and click
the Generate button. The four key boxes will be automatically populated with key values.
• Manual. Enter the number of hexadecimal digits appropriate to the encryption strength:
10 characters for 64-bit, 26 digits for 128-bit, or 32 characters for 152-bit WEP encryption
(any combination of 0–9, a–f, or A–F).
Select which of the four keys will be the default.
4. Select the ke
y to be used as the default key by selecting the radio button. (Data transmissions
are always encrypted using the default key.)