
User's Manual
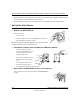
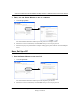
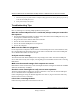
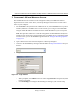
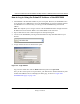
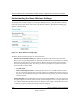
Table Of Contents
- Trademarks
- Statement of Conditions
- Federal Communications Commission (FCC) Compliance Notice: Radio Frequency Notice
- Canadian Department of Communications Compliance Statement
- Product and Publication Details
- Contents
- Chapter 1 About This Manual
- Chapter 2 Introduction
- Chapter 3 Basic Installation and Configuration
- Overview of Wireless USB Print Server Setup
- Verify Printer and Network Readiness
- Understanding WGPS606 Wireless Security Options
- Observe these Precautions
- Set Up the Print Server
- Now, Set Up a PC
- Troubleshooting Tips
- Two Ways to Log In to the WGPS606
- Using the IP Settings Options
- Understanding the Basic Wireless Settings
- Chapter 4 Management
- Chapter 5 Advanced Configuration
- Chapter 6 Troubleshooting
- Appendix A Specifications
- Appendix B Wireless Networking Basics
- Glossary

Reference Manual for the NETGEAR 54 Mbps Wireless USB Print Server with 4-Port Switch
Basic Installation and Configuration 3-11
Draft 1, 01 Feb 05
Using the IP Settings Options
The IP Settings page is under the Setup heading of the main menu. Use this page to configure
static IP addresses.
Figure 3-6: Basic IP Settings page
• The IP Address Source
The wireless access point is shipped preconfigured to use a private IP address on the LAN
side, and to act as a DHCP client. If the wireless access point does not find a DHCP server on
the Ethernet LAN, it defaults to this IP configuration:
– IP Address — 192.168.0.201
– IP Subnet Mask — 255.255.255.0
If your network has a requirement to use a different IP addressing scheme, you can make those
changes in this page.
• WGPS606 Name (NetBIOS)
You can change the access point name after the initial configuration. Enter a new name for the
wireless USB print server and click Apply to save your changes.
Remember to click Apply to save your changes.