
User's Manual
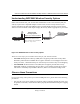
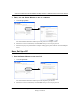
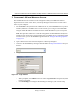
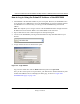
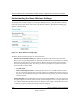
Table Of Contents
- Trademarks
- Statement of Conditions
- Federal Communications Commission (FCC) Compliance Notice: Radio Frequency Notice
- Canadian Department of Communications Compliance Statement
- Product and Publication Details
- Contents
- Chapter 1 About This Manual
- Chapter 2 Introduction
- Chapter 3 Basic Installation and Configuration
- Overview of Wireless USB Print Server Setup
- Verify Printer and Network Readiness
- Understanding WGPS606 Wireless Security Options
- Observe these Precautions
- Set Up the Print Server
- Now, Set Up a PC
- Troubleshooting Tips
- Two Ways to Log In to the WGPS606
- Using the IP Settings Options
- Understanding the Basic Wireless Settings
- Chapter 4 Management
- Chapter 5 Advanced Configuration
- Chapter 6 Troubleshooting
- Appendix A Specifications
- Appendix B Wireless Networking Basics
- Glossary

Reference Manual for the NETGEAR 54 Mbps Wireless USB Print Server with 4-Port Switch
Basic Installation and Configuration 3-7
Draft 1, 01 Feb 05
1CONFIGURE LAN AND WIRELESS ACCESS
The WG602 Wireless Access Point can be configured remotely from Microsoft Internet
Explorer browser version 5.0 or above, or Netscape Navigator web browser version 4.78 or
above on your computer.
a. The WGPS606 is set by default to be a DHCP client. So, if the WGPS606 has not yet been
installed, and there is no DHCP server on the network, you can log in to the WGPS606
using its default IP address. 192.168.0.227 is the default IP address of your access point.
Note: This procedure which uses a static IP configuration. If WGPS606 has already been
installed or it is connected to a network where there as a DHCP server as commonly found
in home routers, you can the NetBIOS login described in “Using the IP Settings Options”
on page 3-11.
b. Open a Web browser such as Internet Explorer or Netscape Navigator.
c. Connect to the WGPS606 by entering its default address of http://192.168.0.227 into your
browser.
d. A login window like the one shown below opens:
Figure 3-3: Login window
– When prompted, enter admin for the user name and password for the password, both
in lower case letters.
– Click IP Settings and configure the IP Settings according to your network setup.