
User's Manual
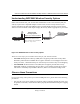
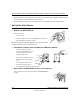
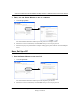
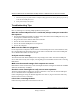
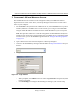
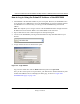
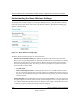
Table Of Contents
- Trademarks
- Statement of Conditions
- Federal Communications Commission (FCC) Compliance Notice: Radio Frequency Notice
- Canadian Department of Communications Compliance Statement
- Product and Publication Details
- Contents
- Chapter 1 About This Manual
- Chapter 2 Introduction
- Chapter 3 Basic Installation and Configuration
- Overview of Wireless USB Print Server Setup
- Verify Printer and Network Readiness
- Understanding WGPS606 Wireless Security Options
- Observe these Precautions
- Set Up the Print Server
- Now, Set Up a PC
- Troubleshooting Tips
- Two Ways to Log In to the WGPS606
- Using the IP Settings Options
- Understanding the Basic Wireless Settings
- Chapter 4 Management
- Chapter 5 Advanced Configuration
- Chapter 6 Troubleshooting
- Appendix A Specifications
- Appendix B Wireless Networking Basics
- Glossary

Reference Manual for the NETGEAR 54 Mbps Wireless USB Print Server with 4-Port Switch
3-4 Basic Installation and Configuration
Draft 1, 01 Feb 05
• Unplug this device from its power source before cleaning. Use only a slightly dampened cloth
for cleaning. Do not use liquid or aerosol cleaners.
• Avoid using this product near water. Exposure to water poses an electric-shock hazard.
Set Up the Print Server
1. REMOVE THE NETGEAR CD.
What’s on the CD?
• A setup wizard
• Software utilities you use for customizing your print server
• The installation and reference guides
Note: Do not plug the Wireless USB Print Serverin until you are
prompted to do so by the wizard on the CD.
2. FAMILIARIZE YOURSELF WITH THE WIRELESS USB PRINT SERVER.
• Take note of the useful infor-
mation on the bottom label such
as the port functions, default
login information, etc.
• If you plan to stand the wireless
USB print server up, attach its
feet.
• Set the antenna vertically for
best side-to-side coverage or
horizontally for best top-to-bottom coverage.
3.
NOW, INSERT THE NETGEAR CD INTO YOUR COMPUTER.
If the wizard screen does not appear, double click autorun.exe on
the CD.