
User's Manual

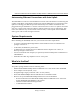

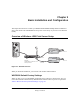
Table Of Contents
- Trademarks
- Statement of Conditions
- Federal Communications Commission (FCC) Compliance Notice: Radio Frequency Notice
- Canadian Department of Communications Compliance Statement
- Product and Publication Details
- Contents
- Chapter 1 About This Manual
- Chapter 2 Introduction
- Chapter 3 Basic Installation and Configuration
- Overview of Wireless USB Print Server Setup
- Verify Printer and Network Readiness
- Understanding WGPS606 Wireless Security Options
- Observe these Precautions
- Set Up the Print Server
- Now, Set Up a PC
- Troubleshooting Tips
- Two Ways to Log In to the WGPS606
- Using the IP Settings Options
- Understanding the Basic Wireless Settings
- Chapter 4 Management
- Chapter 5 Advanced Configuration
- Chapter 6 Troubleshooting
- Appendix A Specifications
- Appendix B Wireless Networking Basics
- Glossary

Basic Installation and Configuration 3-1
Draft 1, 01 Feb 05
Chapter 3
Basic Installation and Configuration
This chapter describes how to install your NETGEAR WGPS606 54 Mbps Wireless USB Print
Server with 4-Port Switch WGPS606 and set up basic connectivity on your Local Area Network
(LAN).
Overview of Wireless USB Print Server Setup
Figure 3-1: Network overview
When you finish the installation, your network will resemble this illustration.
WGPS606 Default Factory Settings
When you first receive your WGPS606, the default factory settings are shown below. You can
restore these defaults with the Factory Default Restore button on the rear panel as explained in
“How to Restore the Factory Default Settings” on page 2-6.
7'03
-BPS7IRELESS53"0RINT3ERVER
WITHPORT3WITCH
0RINTER!
0RINTER"
53"#ABLE
53"#ABLE
$ESKTOP0#