
Reference Manual


Configuring Your WGE101
This section provides instructions for configuring the WGE101 Bridge using the Smart
Navigator. You use the Smart Navigator, itself, to change basic settings:
• Network Name (SSID)
• Country/Region
• Network Type (Infrastructure/Ad-Hoc)
• Security Settings
• IP Address
To change more advanced settings, you use the bridge’s internal configuration software using an
Internet browser. In addition to the basic settings, you can make the following changes using
the browser-based software:
• Changing the password.
• Setting the bridge’s data rate/channel.
• Upgrading the bridge’s firmware.
• Restoring the factory default settings.
For details on using the browser-based configuration software see the WGE101 Reference
Manual on the WGE101 54 Mbps Wireless Ethernet Bridge Resource CD.
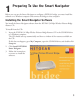
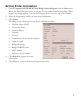
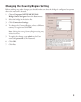
Starting the Smart Navigator
1. Choose Programs>NETGEAR WGE101
Bridge>Smart Navigator from the Start menu.
When the Smart Navigator opens, it searches
for any connected WGE101 Bridge. When
located, any bridge appears in the device list at
the top.
2. Select the bridge that you want to configure.
3. To configure basic connection settings, click
Connection Settings.
OR
To configure more advanced settings or the IP
address, click Advanced Settings. Type admin
as the User name and the current password.
(password is the default.) Click OK.
4. To refresh the device list, click
Scan.
6
2
2