
User's Manual


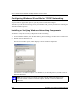
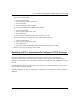
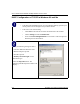

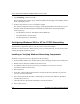
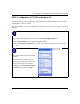
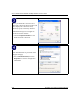
Table Of Contents
- Trademarks
- Statement of Conditions
- Federal Communications Commission (FCC) Compliance Notice: Radio Frequency Notice
- Canadian Department of Communications Compliance Statement
- CE Declaration of Conformity
- Contents
- Chapter 1 About This Manual
- Chapter 2 Introduction
- Chapter 3 Basic Installation and Configuration
- Observing Placement and Range Guidelines
- Default Factory Settings
- Understanding WG602 v2 Wireless Security Options
- Installing the 54 Mbps Wireless Access Point WG602 v2
- Two Ways to Log In to the WG602 v2
- Using the Basic IP Settings Options
- Understanding the Basic Wireless Settings
- Understanding Wireless Security Options
- How to Configure WEP Wireless Security
- How to Configure WPA-PSK Wireless Security
- How to Restrict Wireless Access by MAC Address
- Chapter 4 Management
- Chapter 5 Advanced Configuration
- Chapter 6 Troubleshooting
- Troubleshooting
- No lights are lit on the access point.
- The Ethernet LAN light is not lit.
- The Wireless LAN activity light is not lit.
- I cannot configure the wireless access point from a browser.
- I cannot access the Internet or the LAN with a wireless capable computer.
- When I enter a URL or IP address I get a timeout error.
- Using the Reset Button to Restore Factory Default Settings
- Troubleshooting
- Appendix A Specifications
- Appendix B Wireless Networking Basics
- Appendix C Network, Routing, Firewall, and Cabling Basics
- Appendix D Preparing Your PCs for Network Access
- Glossary
- Index

User’s Guide for the WG602 54 Mbps Wireless Access Point
D-6 Preparing Your PCs for Network Access
2. Type winipcfg, and then click OK.
The IP Configuration window opens, which lists (among other things), your IP address, subnet
mask, and default gateway.
3. From the drop-down box, select your Ethernet adapter.
The window is updated to show your settings, which should match the values below if you are
using the default TCP/IP settings that NETGEAR recommends for connecting through a
router or gateway:
• The IP address is between 192.168.0.2 and 192.168.0.254
• The subnet mask is 255.255.255.0
• The default gateway is 192.168.0.1
Configuring Windows 2000 or XP for TCP/IP Networking
As part of the PC preparation process, you may need to install and configure
TCP/IP on each networked PC. Before starting, locate your Windows CD; you may need to insert
it during the TCP/IP installation process.
Installing or Verifying Windows Networking Components
To install or verify the necessary components for IP networking:
1. On the Windows taskbar, click the Start button, point to Settings, and then click Control Panel.
2. Double-click the Network and Dialup Connections icon.
3. If an Ethernet adapter is present in your PC, you should see an entry for Local Area
Connection. Double-click that entry.
4. Select Properties.
5. Verify that ‘Client for Microsoft Networks’ and ‘Internet Protocol (TCP/IP)’ are present. If
not, select Install and add them.
6. Select ‘Internet Protocol (TCP/IP)’, click Properties, and verify that “Obtain an IP address
automatically is selected.
7. Click OK and close all Network and Dialup Connections windows.
8. Then, restart your PC.