
User's Manual


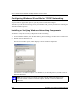
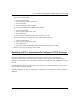
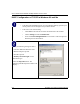

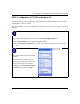
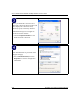
Table Of Contents
- Trademarks
- Statement of Conditions
- Federal Communications Commission (FCC) Compliance Notice: Radio Frequency Notice
- Canadian Department of Communications Compliance Statement
- CE Declaration of Conformity
- Contents
- Chapter 1 About This Manual
- Chapter 2 Introduction
- Chapter 3 Basic Installation and Configuration
- Observing Placement and Range Guidelines
- Default Factory Settings
- Understanding WG602 v2 Wireless Security Options
- Installing the 54 Mbps Wireless Access Point WG602 v2
- Two Ways to Log In to the WG602 v2
- Using the Basic IP Settings Options
- Understanding the Basic Wireless Settings
- Understanding Wireless Security Options
- How to Configure WEP Wireless Security
- How to Configure WPA-PSK Wireless Security
- How to Restrict Wireless Access by MAC Address
- Chapter 4 Management
- Chapter 5 Advanced Configuration
- Chapter 6 Troubleshooting
- Troubleshooting
- No lights are lit on the access point.
- The Ethernet LAN light is not lit.
- The Wireless LAN activity light is not lit.
- I cannot configure the wireless access point from a browser.
- I cannot access the Internet or the LAN with a wireless capable computer.
- When I enter a URL or IP address I get a timeout error.
- Using the Reset Button to Restore Factory Default Settings
- Troubleshooting
- Appendix A Specifications
- Appendix B Wireless Networking Basics
- Appendix C Network, Routing, Firewall, and Cabling Basics
- Appendix D Preparing Your PCs for Network Access
- Glossary
- Index

User’s Guide for the WG602 54 Mbps Wireless Access Point
Preparing Your PCs for Network Access D-5
Selecting the Windows Internet Access Method
1. On the Windows taskbar, click the Start button, point to Settings, and then click Control Panel.
2. Double-click the Internet Options icon.
3. Select “I want to set up my Internet connection manually” or “I want to connect through a
Local Area Network” and click Next.
4. Select “I want to connect through a Local Area Network” and click Next.
5. Clear all check boxes in the LAN Internet Configuration screen and click Next.
6. Proceed to the end of the Wizard.
Verifying TCP/IP Properties for Windows 98 or Me
After your PC is configured and has rebooted, you can check the TCP/IP configuration using the
utility winipcfg.exe:
1. On the Windows taskbar, click the Start button, and then click Run.
By default, the IP Address tab is open on
this window.
• Verify the following:
Obtain an IP address automatically is
selected. If not selected, click in the
radio button to the left of it to select it.
This setting is required to enable the
DHCP server to automatically assign an
IP address.
• Click OK to continue.
Restart the PC.
Repeat these steps for each PC with this
version of Windows on your network.