
User's Manual


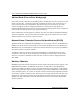
Table Of Contents
- Trademarks
- Statement of Conditions
- Federal Communications Commission (FCC) Compliance Notice: Radio Frequency Notice
- Canadian Department of Communications Compliance Statement
- CE Declaration of Conformity
- Contents
- Chapter 1 About This Manual
- Chapter 2 Introduction
- Chapter 3 Basic Installation and Configuration
- Observing Placement and Range Guidelines
- Default Factory Settings
- Understanding WG602 v2 Wireless Security Options
- Installing the 54 Mbps Wireless Access Point WG602 v2
- Two Ways to Log In to the WG602 v2
- Using the Basic IP Settings Options
- Understanding the Basic Wireless Settings
- Understanding Wireless Security Options
- How to Configure WEP Wireless Security
- How to Configure WPA-PSK Wireless Security
- How to Restrict Wireless Access by MAC Address
- Chapter 4 Management
- Chapter 5 Advanced Configuration
- Chapter 6 Troubleshooting
- Troubleshooting
- No lights are lit on the access point.
- The Ethernet LAN light is not lit.
- The Wireless LAN activity light is not lit.
- I cannot configure the wireless access point from a browser.
- I cannot access the Internet or the LAN with a wireless capable computer.
- When I enter a URL or IP address I get a timeout error.
- Using the Reset Button to Restore Factory Default Settings
- Troubleshooting
- Appendix A Specifications
- Appendix B Wireless Networking Basics
- Appendix C Network, Routing, Firewall, and Cabling Basics
- Appendix D Preparing Your PCs for Network Access
- Glossary
- Index

User’s Guide for the WG602 54 Mbps Wireless Access Point
Advanced Configuration 5-3
You can also enter the MAC address of a wireless access point not on the list followed by
clicking the Add WDS Link to manually add a WDS link.
4. Click Apply to save your settings.
How to Configure a WG602 v2 as a Repeater
Figure 5-2: Wireless Repeater
1.
Configure the WG602 v2 (AP1) and deploy it on LAN Segment 1.
2. Configure the WG602 v2 (AP2) with the same security settings as AP1 and on a channel 5
positions offset from AP1 (e.g., channel 6 on AP1 and channel 11 on AP2). Deploy AP2
without an Ethernet LAN connection.
3. Configure both access points to be on the same WDS Link.
4. Verify connectivity across the network.
• A PC on either AP should be able to connect to the Internet or share files and printers of
any other PCs or servers connected to the network.
LAN
Segment 1
192.168.0.1
Router
AP1
ETHERNET
AP2
Wireless PC Card
in a Notebook Computer
Wireless PC Card
in a Notebook Computer