
User's Manual
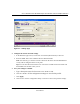
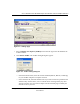


Table Of Contents
- User’s Manual for the NETGEAR Super AG Wireless USB 2.0 Adapter WG111U
- Technical Support
- Statement of Conditions
- FCC Information to User
- Regulatory Compliance Information
- Export Restrictions
- Europe - EU Declaration of Conformity
- Requirements For Operation in the European Community
- Canadian Department of Communications Radio Interference Regulations
- Chapter 1 About This Manual
- Chapter 2 Introduction
- Chapter 3 Basic Setup
- Chapter 4 Configuration
- Chapter 5 Wireless Security Configuration
- Chapter 6 Troubleshooting
- Basic Tips
- Frequently Asked Questions
- General Questions
- Why do I see no more than 54 Mbps on the Configuration Utility status line?
- The WG111U Smart Configuration Utility keeps asking me to save my settings
- Ad Hoc mode is not working correctly
- How to know if the WG111U card has received a valid IP address
- How to use XP’s own Wireless configuration utility
- I cannot connect to the AP that I want from the Networks browser list
- New Hardware Wizard appears after installation has completed
- How to get a PDF copy of the Manual
- General Questions
- Appendix A Technical Specifications
- Appendix B Wireless Networking Basics
- What You Need To Use a Router with a Broadband Modem
- Preparing Your Computers for TCP/IP Networking
- Configuring Windows 95, 98, and Me for TCP/IP Networking
- Configuring Windows NT4, 2000 or XP for IP Networking
- Configuring the Macintosh for TCP/IP Networking
- Verifying the Readiness of Your Internet Account
- Restarting the Network
- Glossary
- Index

User’s Manual for the NETGEAR Super AG Wireless USB 2.0 Adapter WG111U
4-6 Configuration
202-10065-01
Note: The channel number differs depending on the country. The connection speed
automatically defaults to the highest speed.
e. Click OK. The WG111U will scan the area to determine which channel to use.
f. Click Apply.
3. Save your settings in a Profile.
a. Type a descriptive name in the “Profiles” field.
b. Click Save Profile. All the configuration settings are saved in this profile.
c. Click Apply.
d. Click Close to exit the configuration utility.
4. Verify wireless connectivity between your peer devices.
Verify connectivity by using the Ping program:
a. On the Windows taskbar click the Start button, and then click Run.
b. Assuming the target PC is configured with 192.168.0.1 as its IP address, type
ping -t 192.168.0.1 and then click OK.
c. This will cause a continuous ping to be sent to the device with the 192.168.0.1 static IP
address. The ping response should change to “reply.”
At this point the connection is established.