
User's Manual


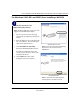

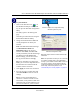


Table Of Contents
- User’s Manual for the NETGEAR Super AG Wireless USB 2.0 Adapter WG111U
- Technical Support
- Statement of Conditions
- FCC Information to User
- Regulatory Compliance Information
- Export Restrictions
- Europe - EU Declaration of Conformity
- Requirements For Operation in the European Community
- Canadian Department of Communications Radio Interference Regulations
- Chapter 1 About This Manual
- Chapter 2 Introduction
- Chapter 3 Basic Setup
- Chapter 4 Configuration
- Chapter 5 Wireless Security Configuration
- Chapter 6 Troubleshooting
- Basic Tips
- Frequently Asked Questions
- General Questions
- Why do I see no more than 54 Mbps on the Configuration Utility status line?
- The WG111U Smart Configuration Utility keeps asking me to save my settings
- Ad Hoc mode is not working correctly
- How to know if the WG111U card has received a valid IP address
- How to use XP’s own Wireless configuration utility
- I cannot connect to the AP that I want from the Networks browser list
- New Hardware Wizard appears after installation has completed
- How to get a PDF copy of the Manual
- General Questions
- Appendix A Technical Specifications
- Appendix B Wireless Networking Basics
- What You Need To Use a Router with a Broadband Modem
- Preparing Your Computers for TCP/IP Networking
- Configuring Windows 95, 98, and Me for TCP/IP Networking
- Configuring Windows NT4, 2000 or XP for IP Networking
- Configuring the Macintosh for TCP/IP Networking
- Verifying the Readiness of Your Internet Account
- Restarting the Network
- Glossary
- Index

User’s Manual for the NETGEAR Super AG Wireless USB 2.0 Adapter WG111U
Basic Setup 3-11
202-10065-01
Configure your WG111U.
a. Click on the WG111U icon on
the Windows desktop or in the system
tray to open the WG111U configuration
utility.
The utility opens to the Settings tab
page.
Click Help for instructions on using the
Smart Wizard Wireless Utility.
b. Change the Network Name SSID and
security Passphrase to match your
network.
Note: The NETGEAR default settings
are Infrastructure mode with
NETGEAR_11g for the wireless
network name SSID, and WPA-PSK
security enabled. If your WLAN settings
are different from the NETGEAR
default settings, you will not connect.
Set up your WG111U accordingly.
Tip: As an alternative to typing in the
SSID, you can use the drop-down list or
the Networks tab to choose from the
available wireless networks.
c. Click Apply to activate the connection.
d. You can also enter a profile name and
click Save Profile to store the current
settings.
Tip: If you use your desktop PC to
connect to a wireless network at work
and at home, create profiles called work
and home. Then, activate whichever one
you need for wherever you are located.
WG111U system tray icon
WG111U Configuration Utility
Tip: Click Help to view the context-sensitive help
information.
Note: This procedure assumes you are connecting
to a wireless network which is using WPA-PSK
security. If your network includes WEP or does not
use security settings, click the Settings tab and
configure the WG111U accordingly. For help with
these steps, click the Help button or see
“Understanding the Security Options” on page 5-1.
Click here to open the configuration utility.