
User's Manual
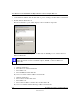
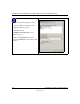

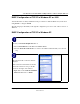
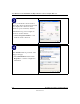
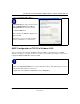
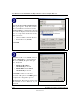
Table Of Contents
- User Manual for the NETGEAR 108 Mbps Wireless USB 2.0 Adapter WG111T
- Contents
- Chapter 1 About This Manual
- Chapter 2 Introduction
- Chapter 3 Basic Setup
- Chapter 4 Configuration
- Chapter 5 Troubleshooting
- Basic Tips
- Frequently Asked Questions
- General Questions
- Why do I see no more than 54 Mbps on the Configuration Utility status line?
- The WG111T Smart Configuration Utility keeps asking me to save my settings
- Ad Hoc mode is not working correctly
- How to know if the WG111T card has received a valid IP address from the Wireless Router/AP
- How to use XP’s own Wireless configuration utility that comes with Windows XP
- I cannot connect to the AP that I want from the Networks browser list
- New Hardware Wizard appears after installation has completed
- How to get a PDF copy of the Manual
- General Questions
- Appendix A Technical Specifications
- Appendix B Wireless Networking Basics
- Appendix C Preparing Your PCs for Network Access
- Glossary
- Index

User Manual for the NETGEAR 108 Mbps Wireless USB 2.0 Adapter WG111T
C-2 Preparing Your PCs for Network Access
202-10056-01
1. On the Windows taskbar, click the Start button, point to Settings, and then click Control Panel.
2. Double-click the Network icon.
The Network window opens, which displays a list of installed components:
You must have an Ethernet adapter or an WG111T, the TCP/IP protocol, and the Client for
Microsoft Networks.
If you need to add TCP/IP:
a. Click the Add button.
b. Select Protocol, and then click Add.
c. Select Microsoft.
d. Select TCP/IP, and then click OK.
If you need to add the Client for Microsoft Networks:
a. Click the Add button.
b. Select Client, and then click Add.
c. Select Microsoft.
d. Select Client for Microsoft Networks, and then click OK.
If you need to add File and Print Sharing for Microsoft Networks:
Note: It is not necessary to remove any other network components shown in the
Network window in order to install the adapter, TCP/IP, or Client for Microsoft
Networks.