
User's Manual


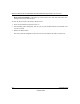
Table Of Contents
- Technical Support
- Trademarks
- Statement of Conditions
- FCC Statement
- Antenna Statement for North America and Australia
- Industry Canada Compliance Statement
- Europe - EU Declaration of Conformity
- Requirements For Operation in the European Community
- Contents
- Chapter 1 About This Manual
- Chapter 2 Introduction
- Chapter 3 Basic Installation and Configuration
- Chapter 4 Management
- Chapter 5 Advanced Configuration
- Chapter 6 Troubleshooting
- No lights are lit on the access point.
- The Wireless LAN activity light does not light up.
- The LAN light is not lit.
- I cannot access the Internet or the LAN with a wireless capable computer.
- I cannot connect to the WG102 to configure it.
- When I enter a URL or IP address I get a timeout error.
- Using the Reset Button to Restore Factory Default Settings
- Appendix A Specifications
- Appendix B Wireless Networking Basics
- Index

Reference Manual for the NETGEAR WG102 ProSafe 802.11g Wireless Access Point
Advanced Configuration 5-5
October 2004
How to Configure Multi-Point Wireless Bridging
Figure 5-5: Multi-Point bridging
1.
Configure the Operating Mode of the WG102 Access Points.
– WG102 (AP1) on LAN Segment 1 in Point-to-Point Bridge mode with the Remote MAC
Address of AP2.
– Because it is in the central location, configure WG102 (AP2) on LAN Segment 2 in
Point-to-Multi-Point Bridge mode. The MAC addresses of the adjacent APs are required
in AP2.
– Configure the WG102 (AP3) on LAN 3 in Point-to-Point Bridge mode with the Remote
MAC Address of AP2.
2. Verify the following parameters for all access points:
• Verify that the LAN network configuration the WG102 Access Points are configured to
operate in the same LAN network address range as the LAN devices
• Only one AP is configured in Point-to-Multi-Point Bridge mode, and all the others are in
Point-to-Point Bridge mode.
• All APs must be on the same LAN. That is, all the APs LAN IP address must be in the
same network.
• If using DHCP, all WG102 Access Points should be set to “Obtain an IP address
automatically (DHCP Client)” in the IP Address Source portion of the Basic IP Settings
menu.
$3
%4(%2.%4
2%3%4
6$#
$3
%4(%2.%4
2%3%4
6$#
$3
%4(%2.%4
2%3%4
6$#
g-ASTERg!0IN
0OINTTO-ULTI0OINT
"RIDGE-ODE
/$1
6HJPHQW
5RXWHU
!0IN
0OINTTO0OINT
"RIDGE-ODE
+XERU6ZLWFK
/$1
6HJPHQW
!0IN
0OINTTO0OINT
"RIDGE-ODE
/$1
6HJPHQW
+XERU6ZLWFK