
Reference Manual


Manage Rogue Access Points, Guest Network Access, and Users
228
ProSAFE Wireless Controller WC9500
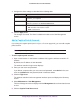
7. Configure the account settings as described in the following table.
Setting Description
Account Name Enter a unique account name. Only alphanumerical characters and underscore
characters (_) are supported.
Amount Enter the total amount that is charged for the period during which access is available.
Enter whole numbers only
.
Currency Sign Enter the currency that is associated with the amount.
Expiry From the menu, select one of the following periods, and enter a valid number in the
field to the left of the menu:
• Hour(s). The
expiration period is measured in one or more hours.
• Day(s). The expiration period is measured in one or more days.
• Week(s). The expiration period is measured in one or more weeks.
• Month(s)
. The expiration period is measured in one or more months.
Print Message (Optional) Enter a message for the captive portal user.
8. Click the Apply button.
The changes are saved. The account is added to the table on the User Management
screen.
Add a Logo and Message on Captive Portal User Information
If you configure a captive portal (see Configure a Portal on page 218), you can add a logo
and message that display if you print captive portal user information.
The logo displays on all printed captive portal user information (see Add a Captive Portal User
on page 230 and Add Multiple Captive Portal Users Simultaneously on page 232). You can
specify whether the message displays on all printed captive portal user information.
Note: If you configure a guest portal, you cannot add a logo or message.
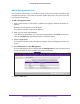
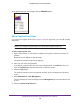
To add a logo and message on printed captive portal user information:
1. Open a web browser. In the browser’
s address field, type the wireless controller’s IP
address.
By default, the IP address is 192.168.0.250.
The wireless controller’s login screen displays.
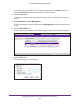
2. Enter your user name and password.
If you did not yet personalize your user name and password, enter admin for the user
name and password for the password, both in lowercase letters.
3. Click the Login button.