
Quick Reference Guide

Installation and Configuration Overview
42
ProSAFE Wireless Controller WC9500
- Delete or Remove. Removes the selected item from the table or screen
configuration.
- Back. Return to the previous screen.
- Next.
Advance to the next screen.
Roadmap for Initial Configuration
After you have connected and logged in to the wireless controller, you need to perform the
initial configuration. If you are not sure how you are going to deploy the wireless controller in
your network, NETGEAR recommends that you read Chapter 2, System Planning and
Deployment Scenarios.
This section is a roadmap for basic configuration only: It provides high-level configuration
steps with references to the sections or chapters that provide detailed configuration steps.
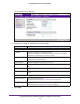
To perform the initial configuration of the wireless controller:
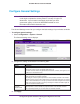
1. Select Configuration > System > General.
The General Settings screen displays.
2. Enter a name for the wireless controller and select the country in which the wireless
controller is used.
3. Click Apply.
4. Select Configuration > System > T
ime
.
The Time Setting screen displays.
5. Select the time zone in which the wireless controller is used. Optionally, configure the NTP
settings.
For more information, see
Manage the Time Settings on page 48.
6. Click Apply.
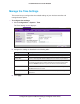
7. Select Configuration > System > IP/VLAN.
The IP Settings screen displays.
8. Enter the IP settings for your network and the VLANs that you want to assign to the wireless
controller.
Note: A management VLAN is used for all SNMP and HTTP traffic to and from
the wireless controller and managed access points.
Note: Clear the Untagged VLAN check box only if the hubs and switches in
your network support the VLAN (802.1Q) standard. Likewise, change the
untagged VLAN value only if the hubs and switches in your network support the
VLAN (802.1Q) standard.
For more information, see IP and VLAN Settings on page 49.