
Quick Reference Guide


Manage Rogue Access Points, Guest Network Access, and Users
120
ProSAFE Wireless Controller WC9500
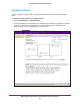
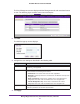
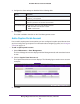
The Add Account pop-up screen displays.
4. Configure the account settings as described in the following table.
Setting Description
Account Name Enter a unique account name. Only alphanumerical characters and underscore
characters (_) are supported.
Amount Enter the total amount that is charged for the period during which access is available.
Enter whole numbers only
.
Currency Sign Enter the currency that is associated with the amount.
Expiry From the menu, select one of the following periods, and enter a valid number in the
field to the left of the menu:
• Hour(s). The
expiration period is measured in one or more hours.
• Day(s). The expiration period is measured in one or more days.
• Week(s). The expiration period is measured in one or more weeks.
• Month(s)
. The expiration period is measured in one or more months.
Print Message (Optional) Enter a message for the captive portal user.
5. Click Apply.
The account is added to the table on the User Management screen.
Add a Captive Portal User
You can add a captive portal user when you have configured a captive portal but not when
you have configured a guest portal. For information about configuring a portal, see Configure
a Portal on page 113.
To add a captive portal user:
1. Select Maintenance > User Management.
The User Management screen displays with the Management tab and associated screen
in view.
2. Click the Captive Portal Users tab.