
Owner's Manual


030-300613 Rev A 15 August 2009
User Guide VersaLink Wireless Gatewa
y
(
Model 7500
)
5.3.3 Connecting USB Devices to Your Gateway
It is recommended that you connect your Gateway via Ethernet connections. However, if you choose to connect
your computer via USB, please follow the instructions in this section.
IMPORTANT: The USB installation will not function for Macintosh computers. Macintosh users will need to
install the Gateway via Ethernet connection. Refer to section 5.3.1, “Connecting Ethernet Devices to Your
Gateway,” for Ethernet installation instructions.
To network a computer in your home or office to your Gateway using a USB connection, please follow these steps:
1. Ensure that you have connected your Gateway to your broadband service using one of the installation methods
explained earlier in sections 5.1, “Connecting Your Gateway to a DSL Network,” or 5.2, “Connecting Your
Gateway to a Network via E1/UPLINK.”
2. Insert the CD-ROM provided with your kit into the CD-ROM drive of the PC that will connect via USB.
3. Use the Y-cable provided with your kit. At the “Y” end of the cable, plug the USB jack (labeled PC/USB, blue)
into the USB port on your computer. Then, at the other end of the Y-cable, plug the Ethernet jack (labeled
PC/ETHERNET, yellow) into the Ethernet connector marked E4/DATA on the rear panel of the Gateway.
NOTE:
1. If you are networking a PC to your Gateway using USB, use only the E4/DATA jack on the rear of your
Gateway.
2. If you are using the E1/UPLINK jack for your broadband connection, you can network PCs to your Gateway via
Ethernet using jacks E2, E3, or E4.
3. If you are networking computers to your Gateway using Ethernet, you can use any of the four LAN Ethernet
jacks on the Gateway’s rear panel; each jack serves as an Ethernet switch.
4. Plug the small end of the power supply cord into the connector marked 12VDC on the rear panel of the
Gateway. Plug the other end of the power supply into an AC wall socket, and then turn on the Gateway (if it is
not already on) by pressing the POWER switch on the back of the Gateway.
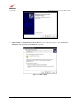
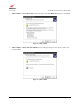
5. Complete the instructions outlined in section 6, “Installing the USB Drivers.” Then, return to this section to
complete the remaining step.
6. After the USB drivers have been installed, check to see if the USB LED is solid green. Solid green indicates that the
USB connection is functioning properly.
Congratulations! You have completed the USB hardware installation. Now, go to section 7, “Accessing Your
Gateway,” to access your Gateway’s Web pages.