
Quick Reference Guide


36 | Chapter 2. Using the Setup Wizard to Provision the STM in Your Network
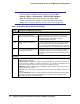
ProSecure Web/Email Security Threat Management (STM) Appliance
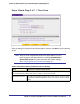
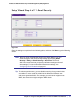
Use Custom NTP Servers The STM regularly updates its RTC by contacting one of the two NTP servers
(primary and backup), both of which you need to specify in the fields that become
available when you select this option.
Note: If you select this option but leave either the Server 1 or Server 2 field blank,
both fields are automatically set to the default NETGEAR NTP servers.
Note: A list of public NTP servers is available at
http://support.ntp.org/bin/view/Servers/WebHome.
Server 1 Name /
IP Address
Enter the IP address or host name of the primary NTP server.
Server 2 Name /
IP Address
Enter the IP address or host name of the secondary NTP
server.
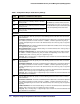
Manually Enter the Date
and Time
Date Enter the date in the yyyy-mm-dd (year-month-date) format.
Time Enter the time in the hh-mm-ss (hour-minutes-seconds) format.
Time Zone
From the drop-down list, select the local time zone in which the STM operates. The correct time zone is required
in order for scheduling to work correctly. You do not need to configure daylight savings time, which is applied
automatically when applicable. Greenwich Mean Time (GMT) is the default setting.
Note: When you select a time zone that is not associated with a location, such as (GMT -08:00) GMT-8, daylight
savings time is automatically disabled. When you select a time zone that is associated with a location, such as
(GMT -08:00) Pacific Time ( US & Canada), daylight savings time is automatically enabled.
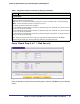
Table 6. Setup Wizard Step 3: System Date and Time Settings (Continued)
Setting Description (or Subfield and Description)