
Quick Reference Guide

ProSafe Wireless-N VPN Firewall SRXN3205 Reference Manual
2-10 Connecting to the Internet (WAN)
v1.0, January 2010
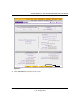
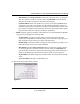
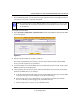
• Get Dynamically from ISP. If your ISP has not assigned a static IP address, select this
radio button. The ISP will automatically assign an IP address to the VPN firewall using
DHCP network protocol. The IP address and subnet mask fields will be inactivated. As an
option, you can select the following checkboxes:
– Client Identifier. Select this checkbox if your ISP requires the Client Identifier
information to assign an IP address using DHCP.
– Vendor Class Identifier. Select this checkbox if your ISP requires the Vendor Class
Identifier information to assign an IP address using DHCP.
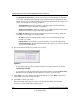
• Use Static IP Address. If your ISP has assigned a fixed (static) IP address, select this
radio button, and configure the following fields:
– IP Address. Enter the Static IP address assigned to you, that identifies the VPN
firewall to your ISP.
– Subnet Mask. Enter the mask provided by the ISP or your network administrator.
– Gateway IP Address. Enter the IP address of the ISP’s gateway, provided by the ISP
or your network administrator.
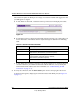
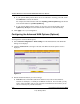
6. Review the Domain Name Server (DNS) server options.
• If your ISP has not assigned any Domain Name Servers (DNS) addresses, click Get
Dynamically from ISP.
• If your ISP (or your IT department) has assigned DNS addresses, click Use These DNS
Servers and enter the DNS server IP addresses provided to you in the fields.
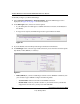
7. Click Apply to save any changes to the WAN ISP Settings. (Or click Reset to discard any
changes and revert to the previous settings.)
8. Click Test to evaluate your entries.
The VPN firewall will attempt to connect to the NETGEAR website. If a successful
connection is made, NETGEAR’s website appears.
Figure 2-9