
Quick Reference Guide


ProSafe Wireless-N VPN Firewall SRXN3205 Reference Manual
Virtual Private Networking Using SSL 7-13
v1.0, January 2010
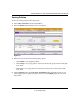
3. In the Add Routes for VPN Tunnel Clients section, enter the destination network IP address
of a local area network or subnet. For example, enter 192.168.0.0.
4. Enter the appropriate Subnet Mask.
5. Click Add.
The “Operation succeeded” message appears at the top of the screen and the new client route
is listed in the Configured Client Routes table.
Restart the VPN firewall if VPN tunnel clients are currently connected. Restarting forces clients to
reconnect and receive new addresses and routes.
Replacing and Deleting Client Routes
If an existing route is no longer needed, or if the specifications of an existing route need to be
changed, follow these steps:
1. Make a new entry with the correct specifications. (This step is not applicable if you only want
to delete the route.)
2. In the Configured Client Routes table, click the delete button in the actions column.
Using Network Resource Objects to Simplify Policies
Network resources are groups of IP addresses, IP address ranges, and services. By defining
resource objects, you can more quickly create and configure network policies. You will not need to
redefine the same set of IP addresses or address ranges when configuring the same access policies
for multiple users.
Defining network resources is optional; smaller organizations can choose to create access policies
using individual IP addresses or IP networks rather than predefined network resources. But for
most organizations, we recommend that you use network resources. If your server or network
configuration changes, by using network resources you can perform an update quickly instead of
individually updating all of the user and group policies.
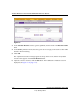
Adding New Network Resources
To define a network resource:
1. Select VPN > SSL VPN from the main/submenu.
2. Select the Resources tab. The Resources screen is displayed (see Figure 7-6 on page 7-14).