
Quick Reference Guide


ProSafe Wireless-N VPN Firewall SRXN3205 Reference Manual
6-30 Virtual Private Networking Using IPsec
v1.0, January 2010
5. Assign at least one range of IP Pool addresses in the First IP Pool field to give to remote VPN
clients.
6. If you have a WINS Server on your local network, enter its IP address.
7. Enter one or two DNS Server IP addresses to be used by remote VPN clients.
8. If you enable Perfect Forward Secrecy (PFS), choose DH Group 1 or 2. This setting must
match exactly the configuration of the remote VPN client,
9. Specify the Local IP Subnet to which the remote client will have access. Typically, this is your
VPN firewall’s LAN subnet, such as 192.168.2.1/255.255.255.0. (If not specified, it will
default to the LAN subnet of the VPN firewall.)
10. Specify the VPN policy settings. These settings must match the configuration of the remote
VPN client. Recommended settings are:
• SA Lifetime: 3600 seconds
• Encryption Algorithm: 3DES
• Authentication Algorithm: SHA-1
11. Click Apply.
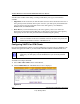
The new record should appear in the List of Mode Config Records table on the Mode Config
screen.
Selecting a Mode Config Record for an IKE Policy
Configure an IKE policy:
1. Select VPN > IPSec VPN from the main/submenu. The IPsec VPN submenu tabs appear with
the IKE Policies screen in view (see Figure 6-13 on page 6-13).
2. Click add to configure a new IKE Policy. The Add IKE Policy screen is displayed (see
Figure 6-14 on page 6-15).
3. Enable Mode Config by checking the Ye s radio box and selecting the Mode Config record
you just created from the pull-down menu. (You can view the parameters of the selected record
by clicking the view selected button.)
Mode Config works only in Aggressive Mode, and Aggressive Mode requires that both ends
of the tunnel are defined by an FQDN.
Note: The IP Pool should not be within your local network IP addresses. Use a
different range of private IP addresses such as 172.20.xx.xx.