
Quick Reference Guide


ProSafe Wireless-N VPN Firewall SRXN3205 Reference Manual
Virtual Private Networking Using IPsec 6-3
v1.0, January 2010
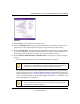
3. Select Gateway as your VPN tunnel connection type.
4. Create a Connection Name. Enter an appropriate name for the connection. This name is not
supplied to the remote VPN endpoint. It is used to help you manage the VPN settings.
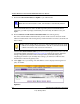
5. Enter a Pre-shared Key. The key must be entered both here and on the remote VPN gateway,
or the remote VPN client. This key should be minimum of 8 characters and should not exceed
49 characters. This method does not require using a CA (Certificate Authority).
6. Enter the Remote WAN IP Address or Internet Name of the gateway to which you want to
connect.
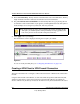
• Both the remote WAN address and your local WAN address are required.
• The remote WAN IP address must be a public address or the Internet name of the remote
gateway. The Internet name is the Fully Qualified Domain Name (FQDN) as registered in
a Dynamic DNS service (see “Configuring Dynamic DNS” on page 2-12). Both local and
remote endpoints should be defined as either FQDN or IP addresses. A combination of IP
address and FQDN is not permissible.
Figure 6-2
Tip: To assure tunnels stay active, after completing the wizard, manually edit the
VPN policy to enable keepalive which periodically sends ping packets to
the host on the peer side of the network to keep the tunnel alive.
Tip: For DHCP WAN configurations, first, set up the tunnel with IP addresses.
Once you validate the connection, use the wizard to create new policies
using FQDN for the WAN addresses.