
User Manual

16.
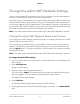
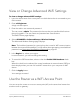
To set up a redirect URL, select the URL radio button and enter the URL for the page
to which you want to redirect users to in the field.
After visitors agree to the terms and conditions, they are redirected to this page.
17. Click the APPLY button.
Your settings are saved.
Set Up Facebook Wi-Fi
You can set up Facebook Wi-Fi on your Orbi WiFi network to offer your customers free
WiFi access if they check in to your existing Facebook business page.
ATTENTION: If a user attempts to access a website over HTTP (by default, over port
80), the user is directed to the Facebook Login page. If a user attempts to accesses a
secure website over HTTPS (by default, over port 443), a Security Waning window opens
in their web browser. The user must click the Allow button on the Security Warning
window to see the see the Facebook Login page.
To set up Facebook Wi-Fi:
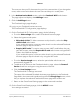
1.
Launch a web browser from a computer or mobile device that is connected to your
Orbi network.
2. Enter orbilogin.com.
A login window opens.
3. Enter the Orbi admin user name and password.
The user name is admin. The password is the one that you specified the first time
that you logged in. The user name and password are case-sensitive.
The BASIC Home page displays.
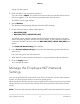
4. Select Guest Portal.
The Guest Portal Settings page displays.
5. Select the Enable Guest Portal check box.
6. Select the Enable SSID Broadcast check box.
By default, this check box is selected. Allowing the router to broadcast its WiFi
network name (SSID) makes it easier to find your network and connect to it. If you
clear this check box, that creates a hidden network.
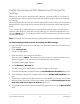
7. To change the network name, type a new name in the Guest Portal Network Name
(SSID) field.
User Manual78Specify Network Settings
Orbi Pro