
User Manual
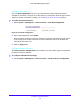
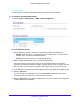

Table Of Contents
- S3300 Smart Managed Pro Switch
- Contents
- 1. Getting Started
- Getting Started with the NETGEAR Switch
- Switch Management Interface
- Connect the Switch to the Network
- Discover a Switch in a Network with a DHCP Server
- Discover a Switch in a Network without a DHCP Server
- Configure the Network Settings on the Administrative System
- Access the Management Interface from a Web Browser
- Understand the User Interfaces
- Interface Naming Convention
- Configuring Interface Settings
- Online Help
- Registration
- 2. Configure System Information
- 3. Configuring Switching
- 4. Configuring Routing
- 5. Configuring Quality of Service
- 6. Managing Device Security
- 7. Maintenance
- 8. Monitoring the System
- A. Configuration Examples
- B. Hardware Specifications and Default Values

Configure System Information
62
S3300 Smart Managed Pro Switch
Configure Auto-DoS
The Auto-DoS Configuration screen lets you automatically enable all the DoS features
available on the switch, except for the L4 Port attack. For information about the types of DoS
attacks the switch can monitor and block, see Configure Denial of Service on p
age 62.
To enable the Auto-DoS feature:
1. Select System > Manage
ment > Denial of Service > Auto-DoS Configuration.
Figure 36. Auto-DoS Configuration
2. Next to Auto-DoS Mode, select Enable.
When an attack is detected, a warning message is logged to the buffered log and is sent
to the
syslog server. At the same time, the port is shut down and can be enabled only
manually by the admin user.
3. Click the Appl
y button.
Configure Denial of Service
The Denial of Service Configuration screen allows you to select which types of DoS attacks
the switch monitors and blocks.
To configure individual DoS settings:
1. Select System > Manage
ment > Denial of Service > Denial of Service Configuration.