
User Manual
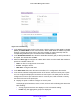
Table Of Contents
- S3300 Smart Managed Pro Switch
- Contents
- 1. Getting Started
- Getting Started with the NETGEAR Switch
- Switch Management Interface
- Connect the Switch to the Network
- Discover a Switch in a Network with a DHCP Server
- Discover a Switch in a Network without a DHCP Server
- Configure the Network Settings on the Administrative System
- Access the Management Interface from a Web Browser
- Understand the User Interfaces
- Interface Naming Convention
- Configuring Interface Settings
- Online Help
- Registration
- 2. Configure System Information
- 3. Configuring Switching
- 4. Configuring Routing
- 5. Configuring Quality of Service
- 6. Managing Device Security
- 7. Maintenance
- 8. Monitoring the System
- A. Configuration Examples
- B. Hardware Specifications and Default Values

Monitoring the System
335
S3300 Smart Managed Pro Switch
• CPU. The CPU port is displayed.
• All. Both physical interfaces and link aggregation groups are displayed.
b. Select the check box next to each physical port or LAG to configure as the mirrored
source.
7. From the Direction list, specify the direction of the traffic to be mirrored from the configured
mirrored port(s). If the value is not configured, it will be shown as None. The default value is
None.
• None. The value is not configured.
• Tx and Rx. Monitors both transmitted and received packets on the selected ports.
• Tx only. Monitors transmitted packets only on the selected ports.
• Rx only. Monitors received packets only on the selected ports.
8. Click the Apply button to send the updated configuration to the switch. Configuration
changes take effect immediately.
If the port is configured as a source port, the Status value is Mirrored.
9. Click Cancel button to cancel the configuration on the screen and reset the data on the
screen to the latest value of the switch.
10. The Status column is a nonconfigurable field and indicates the interface state.
To delete a mirrored port:
1. Select the check box next to the mirrored port.
2. Click the Delete button.