
User Manual

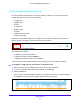
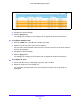
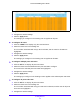

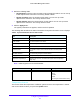
Table Of Contents
- S3300 Smart Managed Pro Switch
- Contents
- 1. Getting Started
- Getting Started with the NETGEAR Switch
- Switch Management Interface
- Connect the Switch to the Network
- Discover a Switch in a Network with a DHCP Server
- Discover a Switch in a Network without a DHCP Server
- Configure the Network Settings on the Administrative System
- Access the Management Interface from a Web Browser
- Understand the User Interfaces
- Interface Naming Convention
- Configuring Interface Settings
- Online Help
- Registration
- 2. Configure System Information
- 3. Configuring Switching
- 4. Configuring Routing
- 5. Configuring Quality of Service
- 6. Managing Device Security
- 7. Maintenance
- 8. Monitoring the System
- A. Configuration Examples
- B. Hardware Specifications and Default Values

Getting Started
33
S3300 Smart Managed Pro Switch
4. Configure the desired settings.
5. Click the Apply button.
The settings you configure in the heading row are applied to the selected interface.
To configure a single LAG by using the Go To Interface field:
1. Click the LAGS link or the All link to display the LAGs.
2. In the Go To Interface field, type the LAG number, for example l3.
3. Click the Go button.
The check box associated with the interface is selected, the row for the selected interface
is highlighted, and the interface number appears in the heading row.
4. Configure the desired settings.
5. Click the Apply button.
The settings you configure in the heading row are applied to the selected interface.
To configure a single port:
1. Ensure that the screen is displaying all ports, and not only the LAGs.
2. Select the check box next to the port number.
The row for the selected interface is highlighted, and the interface number appears in the
heading row.
3. Configure the desired settings.
4. Click the Apply button.
The settings you configure in the heading row are applied to the selected interface.
To configure a single LAG:
1. Click the LAGS link or the All link to display the LAGs.
2. Select the check box next to the LAG number.
The row for the selected interface is highlighted, and the interface number appears in the
heading row.
3. Configure the desired settings.
4. Click the Apply button.
The settings you configure in the heading row are applied to the selected interface.
To configure multiple ports:
1. Ensure that the screen is displaying all ports, and not only the LAGs.
2. Select the check box next to each port to configure.
The row for each selected interface is highlighted.