
User Manual

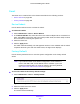

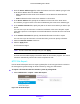
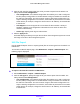


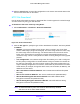
Table Of Contents
- S3300 Smart Managed Pro Switch
- Contents
- 1. Getting Started
- Getting Started with the NETGEAR Switch
- Switch Management Interface
- Connect the Switch to the Network
- Discover a Switch in a Network with a DHCP Server
- Discover a Switch in a Network without a DHCP Server
- Configure the Network Settings on the Administrative System
- Access the Management Interface from a Web Browser
- Understand the User Interfaces
- Interface Naming Convention
- Configuring Interface Settings
- Online Help
- Registration
- 2. Configure System Information
- 3. Configuring Switching
- 4. Configuring Routing
- 5. Configuring Quality of Service
- 6. Managing Device Security
- 7. Maintenance
- 8. Monitoring the System
- A. Configuration Examples
- B. Hardware Specifications and Default Values

Maintenance
299
S3300 Smart Managed Pro Switch
Note: To download SSH key files, SSH must be administratively disabled,
and there can be no active SSH sessions.
Note: To download SSL PEM files, SSL must be administratively disabled,
and there can be no active SSH sessions.
3. The Image Name field is visible only when File Type - Software is selected. From the
Image Name field, select one of the images from the list.
• image1 — Select image1 to download image1.
• image2 — Select image2 to download image2.
4. From the Server Address Type field, specify the format for the address you type in the
TFTP Server Address field. The factory default is IPv4.
• IPv4. Indicates the TFTP server address is an IP address in dotted-decimal format.
• DNS. Indicates the TFTP server address is a hostname.
Note: During the file transfer, the DNS name will be automatically replaced
with the IP address.
5. In the TFTP Server IP field, specify the IP address or hostname of the TFTP server.
The address you type must be in the format indicated by the TFTP Server Address Type.
The factory default is the IPv4 address 0.0.0.0.
6. In the Transfer File Path field, specify the path on the TFTP server where the file is located
that you want to download. The factory default is blank.
Enter up to 160 characters. Include the backslash at the end of the path. A path name
with a space is not accepted. Leave this field blank to save the file to the root TFTP
directory.
7. In the Remote File Name field, specify the name of the file to download from the TFTP
server. You can enter up to 32 characters. A filename cannot include a space or the
following symbols: '\/:*?"<>|'. The factory default is blank.
8. Select the Start File Transfer check box to initiate the file export.
Note: The file transfer will not begin until you click Apply.
9. Click the Apply button to begin the file transfer.
The last row of the table displays information about the progress of the file transfer. The
screen refreshes automatically until the file transfer completes or fails.
To activate a software image that you download to the switch, see File Management on
page 303.