
User Manual

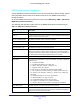
Table Of Contents
- S3300 Smart Managed Pro Switch
- Contents
- 1. Getting Started
- Getting Started with the NETGEAR Switch
- Switch Management Interface
- Connect the Switch to the Network
- Discover a Switch in a Network with a DHCP Server
- Discover a Switch in a Network without a DHCP Server
- Configure the Network Settings on the Administrative System
- Access the Management Interface from a Web Browser
- Understand the User Interfaces
- Interface Naming Convention
- Configuring Interface Settings
- Online Help
- Registration
- 2. Configure System Information
- 3. Configuring Switching
- 4. Configuring Routing
- 5. Configuring Quality of Service
- 6. Managing Device Security
- 7. Maintenance
- 8. Monitoring the System
- A. Configuration Examples
- B. Hardware Specifications and Default Values

Configuring Switching
195
S3300 Smart Managed Pro Switch
MRP Port Settings
Use the MRP Port Settings screen to configure the per-port MRP mode and timer settings.
The timers control when and how often various messages are transmitted on each interface.
To configure the MRP port parameters:
1. Select Switching> MRP > Advanced > Port Settings.
2. Select the interfaces to configure.
For information about how to select and configure one or more ports, see Configuring
Interface Settings on page 32.
3. Configure the following MRP port settings:
a. Enable or disable MVRP on the interface.
b. Enable or disable MMRP on the interface.
c. Enable or disable MSRP on the interface.
d. Specify the value, in centiseconds, of the MRP Join Timer.
e. Specify the value, in centiseconds, of the MRP Leave Timer.
f. Specify the value, in centiseconds, of the MRP LeaveAll Timer.
g. In the MSRP SR class PVID field, specify the default VLAN ID to be used for MSRP
stream traffic.
ClassA/ClassB Boundary Port fields are not configurable and show whether the interface
is a boundary port.
4. Click the Apply button.