
User Manual


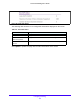

Table Of Contents
- S3300 Smart Managed Pro Switch
- Contents
- 1. Getting Started
- Getting Started with the NETGEAR Switch
- Switch Management Interface
- Connect the Switch to the Network
- Discover a Switch in a Network with a DHCP Server
- Discover a Switch in a Network without a DHCP Server
- Configure the Network Settings on the Administrative System
- Access the Management Interface from a Web Browser
- Understand the User Interfaces
- Interface Naming Convention
- Configuring Interface Settings
- Online Help
- Registration
- 2. Configure System Information
- 3. Configuring Switching
- 4. Configuring Routing
- 5. Configuring Quality of Service
- 6. Managing Device Security
- 7. Maintenance
- 8. Monitoring the System
- A. Configuration Examples
- B. Hardware Specifications and Default Values

Configuring Switching
156
S3300 Smart Managed Pro Switch
authority. The switch comes preconfigured with the following OUIs that identify the IP phone
manufacturer:
• 00:01:E3: SIEMENS
• 00:03:6B: CISCO1
• 00:12:43: CISCO2
• 00:0F:E2: H3C
• 00:60:B9: NITSUKO
• 00:D0:1E: PINTEL
• 00:E0:75: VERILINK
• 00:E0:BB: 3COM
• 00:04:0D: AVAYA1
• 00:1B:4F: AVAYA2
• 00:04:13: SNOM
You can select an existing OUI or add a new OUI and description to identify the IP phones on
the network.
To add a new OUI prefix:
1. Select Switching> Auto-VoIP> OUI-based > OUI Table.
2. In the Telephony OUI(s) field, specify the VOIP OUI prefix.
The OUI prefix must be in the format AA:BB:CC.
3. In the Description field, type a description that identifies the manufacturer or vendor
associated with the OUI.
The maximum length of description is 32 characters.
4. Click the Add button.
To delete one or more OUI prefixes from the table:
1. Select the check box next to each OUI prefix to remove.
2. Click the Delete button.
Display Auto-VoIP Status
Use this screen to display Auto-VoIP status.To display the screen, click Switching >
Auto-VoIP > Auto-VoIP Status. A screen similar to the following is displayed.