
User Manual
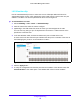
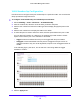
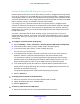
Table Of Contents
- S3300 Smart Managed Pro Switch
- Contents
- 1. Getting Started
- Getting Started with the NETGEAR Switch
- Switch Management Interface
- Connect the Switch to the Network
- Discover a Switch in a Network with a DHCP Server
- Discover a Switch in a Network without a DHCP Server
- Configure the Network Settings on the Administrative System
- Access the Management Interface from a Web Browser
- Understand the User Interfaces
- Interface Naming Convention
- Configuring Interface Settings
- Online Help
- Registration
- 2. Configure System Information
- 3. Configuring Switching
- 4. Configuring Routing
- 5. Configuring Quality of Service
- 6. Managing Device Security
- 7. Maintenance
- 8. Monitoring the System
- A. Configuration Examples
- B. Hardware Specifications and Default Values

Configuring Switching
142
S3300 Smart Managed Pro Switch
LAG Membership
Use the LAG Membership screen to select two or more full-duplex Ethernet links to be
aggregated together to form a link aggregation group (LAG), which is also known as a port
channel. The switch can treat the port channel as if it were a single link.
To add members to a LAG:
1. Select Sw
itching> LAG > Basic > LAG Membership.
2. From t
he LAG ID list, select the LAG to configure.
3. (Opt
ionally) In the LAG Name field, enter the name you want assigned to the LAG.
You can enter any string of up to 15 alphanumeric cha
racters. A valid name has to be
specified to create the LAG.
4. In
the Port Selection Table, click the box below each port to include in the LAG.
A check mark in the box below the port indicates that the port is
a member of the LAG. In
the following figure, ports 11–14 are members of LAG 1.
Figure 84. LAG Membership
5. Click the Apply button.
6. T
o verify the configuration and view the ports that are members of the selected LAG, click
Current Members. This action opens a new window with a list of current members.