
User Manual
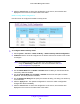

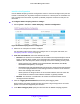

Table Of Contents
- S3300 Smart Managed Pro Switch
- Contents
- 1. Getting Started
- Getting Started with the NETGEAR Switch
- Switch Management Interface
- Connect the Switch to the Network
- Discover a Switch in a Network with a DHCP Server
- Discover a Switch in a Network without a DHCP Server
- Configure the Network Settings on the Administrative System
- Access the Management Interface from a Web Browser
- Understand the User Interfaces
- Interface Naming Convention
- Configuring Interface Settings
- Online Help
- Registration
- 2. Configure System Information
- 3. Configuring Switching
- 4. Configuring Routing
- 5. Configuring Quality of Service
- 6. Managing Device Security
- 7. Maintenance
- 8. Monitoring the System
- A. Configuration Examples
- B. Hardware Specifications and Default Values

Configure System Information
119
S3300 Smart Managed Pro Switch
If the incoming rate of DHCP packets exceeds the value of this object for consecutively
burst interval seconds, the port will be shut down. If this value is N/A, then the burst
interval has no meaning, and rate limiting is disabled.
6. In the Bu
rst Interval (secs) field, specify the burst interval value for rate limiting purposes
on this interface.
If the rate limit is N/A, then the burst interval has no meanin
g and the field displays N/A.
7. Click the Ap
ply button.
Binding Configuration
Use this screen to view, add, and remove static bindings in the DHCP snooping bindings
database and to view or clear the dynamic bindings in the bindings table.
To configure static DHCP bindings:
1. Select System> Services > DHCP Snoo
ping > Binding Configuration.
Figure 69. DHCP Snooping Binding Configuration
2. From the Interface list, select the interface on which the DHCP client is authorized.
3. I
n the MAC Address field, specify the MAC address for the binding to be added.
This is the key to the binding database.
4. Fro
m the VLAN ID list, select the ID of the VLAN the client is authorized to use.
5. I
n the IP Address field, specify the IP address of the client.
6. Click the Ad
d button.
The DHCP snooping binding entry is added to the database.