
User Manual


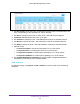

Table Of Contents
- M6100 Web Management User Guide
- Contents
- 1. Getting Started
- 2. Configuring System Information
- 3. Configuring Switching Information
- 4. Routing
- 5. Configuring Quality of Service
- 6. Managing Device Security
- 7. Monitoring the System
- 8. Maintenance
- 9. Help
- A. Default Settings
- B. Configuration Examples
- C. Notification of Compliance

Configuring System Information
101
M6100 Web Management User Guide
4. Use Access Mode to specify the access level for this community by selecting Read/Write or
Read Only from the menu.
5. Use Status to specify the status of this community by selecting Enable or Disable from the
menu. If you select enable, the Community Name must be unique among all valid
Community Names or the set request will be rejected. If you select disable, the Community
Name will become invalid.
6. Click Add to add the currently selected community to the switch.
7. Click Delete to delete the currently selected Community Name.
Trap Configuration
This page displays an entry for every active Trap Receiver. To access this page, click
System
SNMP SNMP V1/V2 Trap Configuration.
1. To add a host that will receive SNMP traps, enter trap configuration information in the
available fields described below, and then click Add.
a. Community Name - Enter the community string for the SNMP trap packet to be sent
to the trap manager
. This may be up to 16 characters and is case sensitive.
b. Version - Select the trap version to be used by the receiver from the menu:
• SNMP V1 - Uses SNMP V1 to send traps to the receiver
.
• SNMP V2 - Uses SNMP V2 to send traps to the receiver
.
c. Protocol - Select the protocol to be used by the receiver from the menu. Select the
IPv4 if the receiver's address is IPv4 address or IPv6 if the receiver's address is
IPv6.
d. Address - Enter the IPv4 address in x.x.x.x format or IPv6 address in
xxxx:xxxx:xxxx:xxxxx:xxxx:xxxx:xxxx:xxxx or a hostname starting with an alphabet to
receive SNMP traps from this device. Length of address can not exceed 158
characters.
e. Status - Select the receiver's status from the menu:
• Enable - Send traps to the receiver
• Disable - Do not send traps to the receiver
.
2. T
o modify information about an existing SNMP recipient, select the check box next to the
recipient, change the desired fields, and then click Apply. Configuration changes take effect
immediately.
3. T
o delete a recipient, select the check box next to the recipient and click Delete.
4. Click Cancel to cancel the configuration on the screen and reset the data on the screen to
the latest value of the switch.